General features and configuration
All photomode mods are based on a common system, which is always used in the same way. The general use of the photomode mods is therefore the same for every game. The following explanations refer globally to these basic possibilities. Differences per game will be taken up and completed in the individual descriptions of the respective game / mod.
The general use of all photomode mods is explained here using the mod for Assassin's Creed Valhalla. However, these global explanations also apply to all other photomode mods.
If you're using MSI Afterburner's RTSS server with the OSD overlay (so you have GPU usage etc. on top of the game window), the tools might cause MSI afterburner to crash the game when you e.g. resize the window. To avoid this, either disable the RTSS overlay in msi afterburner (with the hotkey), or start MSI Afterburner after you've injected the tools. The latter will allow you to have the overlay and use the tools together without MSI Afterburner crash the game.
How to use the photomode mods
Getting started
It's important to keep the IGCSClient.exe window open! Don't close it for the duration of the game session.
After you've unpacked the photomode mod tools zip, e.g ACValhalla_CameraTools_v110.zip into a folder of your choosing, you're ready to use it.
You don't need to unpack the zip into the game folder, it's preferable to unpack the zip into a folder in your My Documents folder. Also, every photomode mod comes
with its own unique IGCSClient. It's not useful to use the IGCSClient.exe of one photomode mod with another one's DLL.
To get started with the photomode mod, you typically do the following: start the game normally and wait till it's in the menu.
Then you start the IGCSClient.exe and click on the Inject DLL button as shown in the screenshot below, highlighted with a red line:
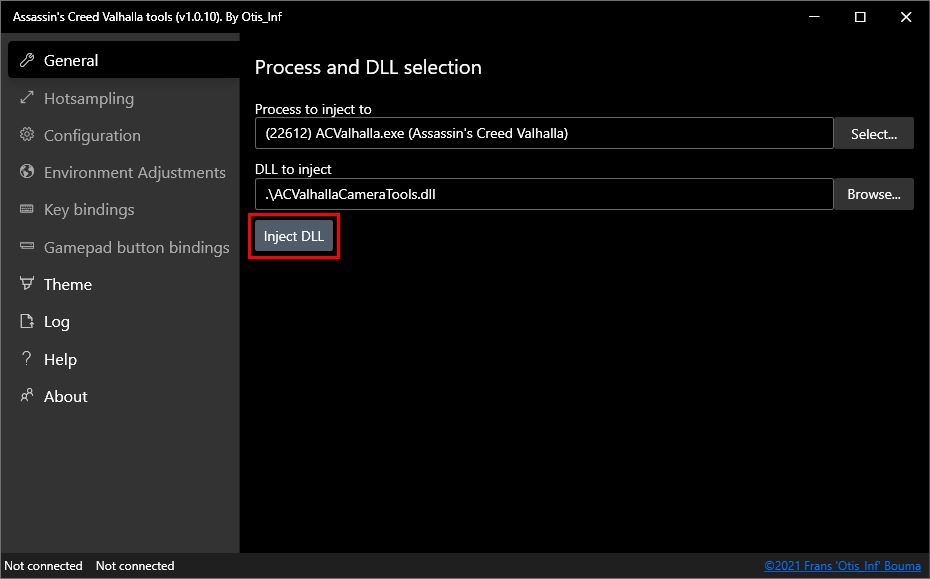
The general tab before injection
If the IGCSClient states to select the process, the .exe it is looking for isn't visible to it or you're running a different version.
To select the right exe, please click the Select button to select it manually. This might happen if you e.g. use the UPlay+ version of a game or
run the game as Administrator and don't run the IGCSClient as Administrator. It's not needed to do so, but in case you want to run the game as Administrator,
you have to run the IGCSClient.exe also as Administrator.
After you've clicked Inject DLL, the client will inject the photomode mod dll into the game's process and will integrate with it. It should look like the following screenshot, and all tabs in the client should now be available:
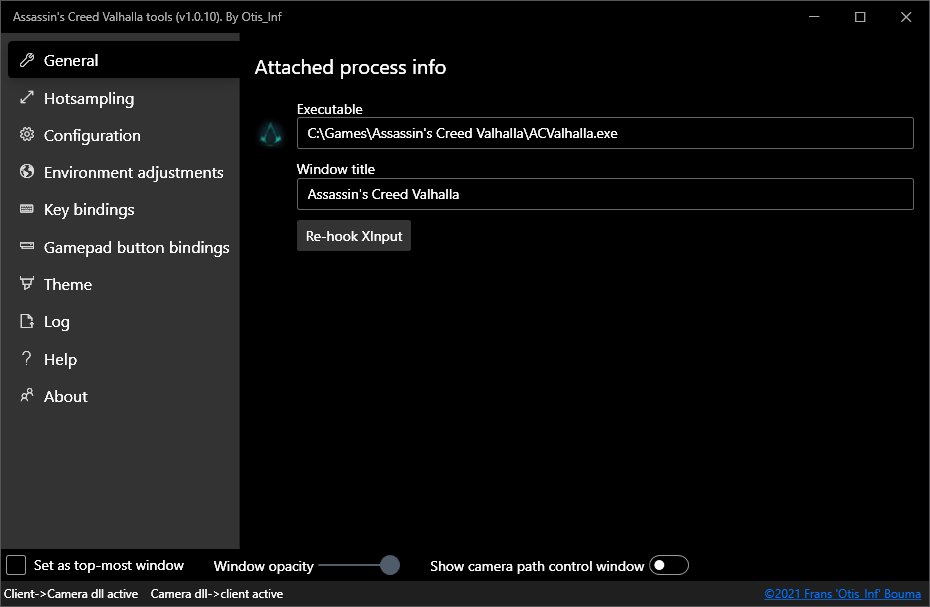
The General tab after injection
Once the photomode mod has found the camera in the game it'll fully initialize the features. You'll get a notification in the left top corner of your monitor when that happens. After the camera has been found, you can use the features, like pause the game, hide the hud and enable the camera. Please see the Controls section below for further details how to activate the various features.
At the bottom of the screen you see three controls: "Set as top-most window", "Window opacity" and "Show camera path control window". These are explained below.
- Set as top-most window
- This checkbox makes the IGCS Client window become the window that's 'on top of' any other window on your desktop, including the game window. So even though you might alt-tab to another window the IGCS Client window will be the top window. This can be handy if you want to test things out with the settings, e.g. time of day or fog control.
- Window opacity
- This slider makes the window semi-transparent (down to 10%).
- Show camera path control window
- This toggle will open (or close if it's open) the camera path control window. The camera path control window allows you to edit and control the camera paths you might have defined as well as start / pause / stop playback of the camera paths. Camera paths are explained in their own section.
It's highly recommended to run the game as 'Windowed' or 'Borderless'. This way the photomode mod can dynamically resize the game window to the resolution you want. See the Hotsampling section below for details.
Configuration
The Resolution Scale option in the screenshot is specific for the Assassin's Creed Valhalla photomode and therefore explained in the guide for that photomode mod.
The photomode mod is highly configurable. To do just that, click the Configuration tab in the IGCSClient, which looks like the following:
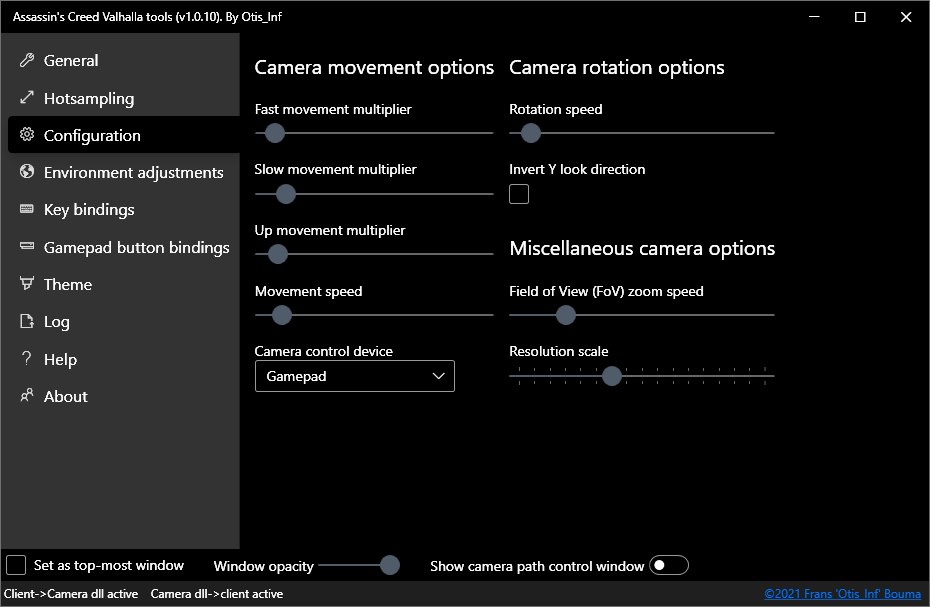
The Configuration tab
The sliders on the tabs in the client can be moved using smaller steps than what sliding with the mouse might accomplish. To do this, select the slider and use the left / right cursor keys to move the slider left/right. In newer cameras, you can also hold shift and ctrl-shift when dragging a slider to have it move slower for precise positioning.
All settings on the Configuration tab are persisted to the IGCSClientSettings.ini file in the folder where the IGCSClient.exe is located so you don't need to
configure it the next time you start the client.
Camera movement options
The first group of options are the Camera movement options. The photomode mod has several speeds for moving the camera: fast, normal, slow and up.
- Fast movement multiplier
- Fast movement multiplier is the value used to move faster than normal; when you press the key or controller button for this action together with moving the camera, the camera will move several times faster than normal. This setting controls how much faster.
- Slow movement multiplier
- Slow movement multiplier is the value used to move slower than normal; when you press the key or controller button for this action together with moving the camera, the camera will move several times slower than normal. This setting controls how much slower. You can also use the slow movement multiplier to rotate slowly, by pressing the key or controller button and rotate the camera at the same time.
- Up movement multiplier
- Up movement multiplier is the value used to move up / down relative to the normal movement speed. The higher this value, the faster the camera will move up/down. Up/down speeds are usually a bit slower than the speed used to move forward/backward/left/right, so keep it a bit below 1.0.
- Movement speed
- This is the normal movement speed of the camera (forward/backward/left/right/up/down). If you want to move the camera faster normally, increase this value.
The photomode mod will slow down movement speed with a factor relative to the current Field of View (FoV) value so when you zoom in (lower FoV), moving / rotating the camera will feel faster, so the movement / rotation speed are lowered.
Camera control device
The camera control device is the device used to control the photomode mod camera, when enabled. By default both the controller and keyboard/mouse are selected. If you want to use your controller/gamepad as the camera control device, you can select that here, by selecting 'Gamepad'.
The selected camera control device is blocked by the photomode mod when the camera is enabled. If you want to operate the game menus or game character while the camera is active,
you have to use the other device than the one that's selected as Camera control device, or disable Block input to game, typically bound to Numpad . (See the section
Keybindings below).
Camera rotation options
- Rotation speed
- The rotation speed is the speed used to rotate the camera. Changing devices (mouse vs. gamepad/controller) might require you to alter this setting.
- Invert Y look direction
- This setting controls whether you want to have the camera rotate downwards when you press the rotate forward button/key or upwards. By default the camera will rotate upwards. If you prefer to rotate downwards instead, check this checkbox.
Miscellaneous camera options
- Field of View (FoV) zoom speed
- The speed with which the camera will zoom in/out.
Key bindings
By default the IGCSClient.exe has a key bound for almost every action. You can alter them on the Key bindings tab by clicking in the textbox of the action and then pressing the key
combination you wish to use, as is shown below in the screenshot with the textbox highlighted with the red line. After that, click OK to keep the new key combination or
Cancel to revert to the old one.
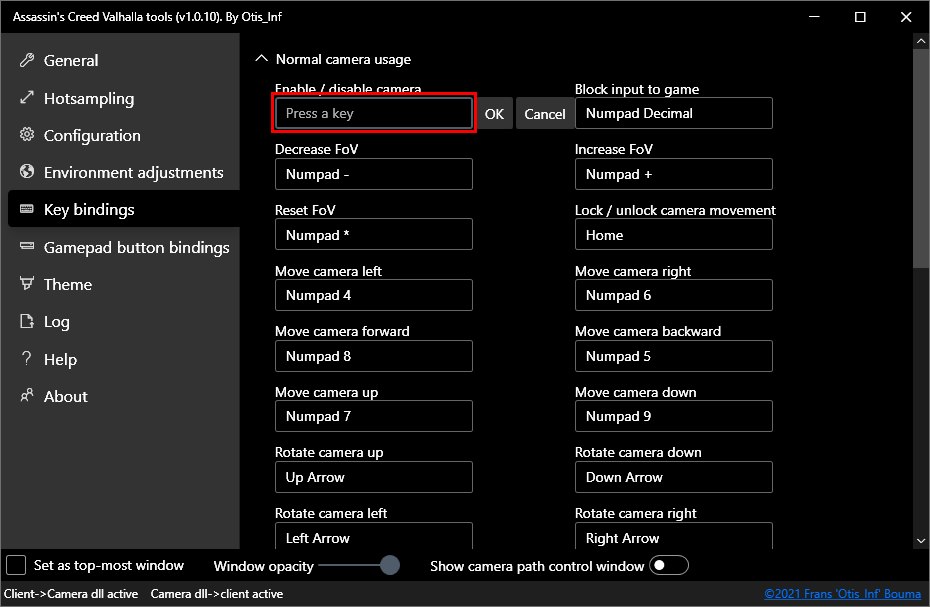
The Key bindings tab when configuring a new key binding
You can bind multiple actions to the same key combination, e.g. you can configure a single key to pause the game, enable the camera and hide the hud. All keybindings you change are persisted to a file so if you want to change a keybinding, you only have to make the change once.
Gamepad button bindings
By default the IGCSClient.exe has a gamepad button defined for several actions.
You can change the definitions for several actions which are bound to gamepad buttons, sticks and triggers. To do so, go to the Gamepad button bindings tab which looks like the
screenshot below:
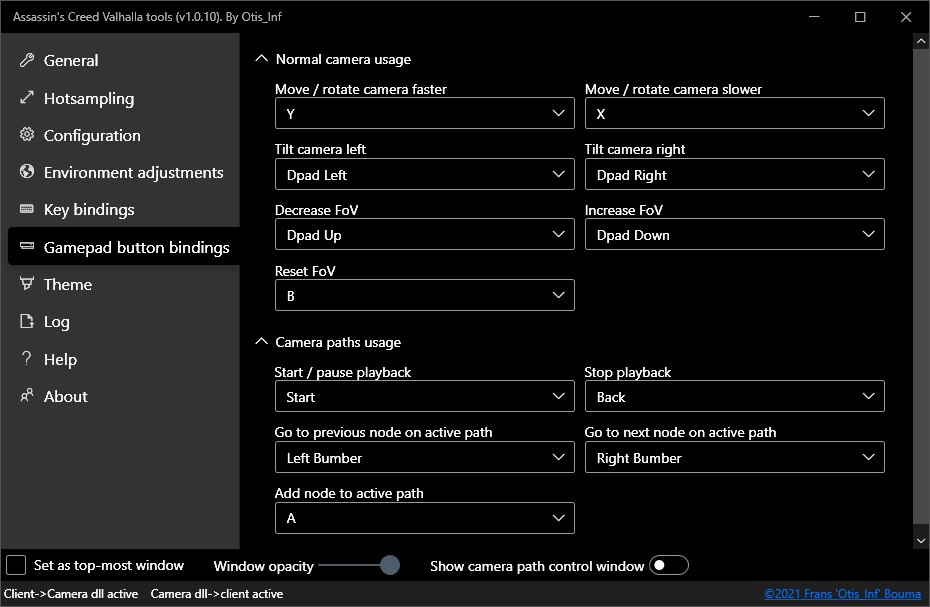
The Gamepad button bindings tab
To select a different gamepad button for a given action, simply select it from the combo box of that action. All bindings are
persisted to the IGCSClientSettings.ini file in the folder where the IGCSClient.exe is located.
If you're left-handed, in newer cameras you can change which stick rotates the camera and which one moves the camera here as well, plus change which trigger moves the camera up and which one moves the camera down.
Note For people using an XBox controller, 'Start' is the button with the 3 stripes, and 'Back' is the Menu button.
Hotsampling
'Hotsampling' is a term for dynamically changing the resolution of the game. This is very handy as you can play the game in your normal monitor's resolution, set up your shot and when you want to take the shot, resize the game to a much higher resolution. To do that, click the Hotsampling tab to use the Hotsampling feature of the photomode mod. The controls for hotsampling look like the screenshot below:
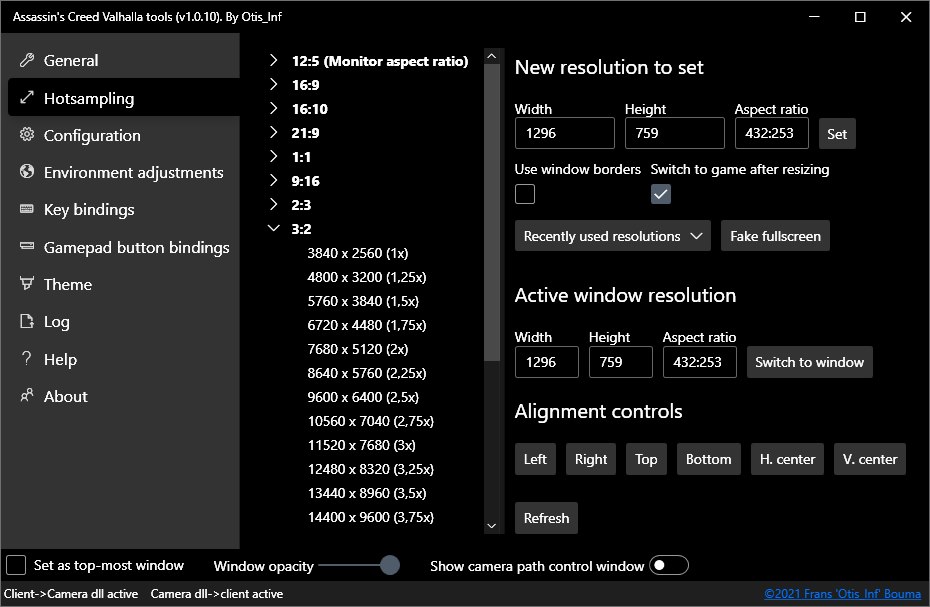
The Hotsampling tab
The client has already pre-generated a lot of resolutions for a variety of aspect ratios for you. To resize to a different resolution, simply select it in the tree on the left. This will fill in the Width and Height of the New resolution to set in the top right. To resize the window you then click on Set. The game window will now resize to the game window and resolution and aspect ratio you've selected. If the window does resize but the game resolution does not, you likely run the game as full screen. Please run the game as 'Windowed', the photomode mod will offer you to get rid of the Window border.
To quickly switch between resolutions you've already chosen before, click the Recently used resolutions button. This button will enlist the last 10 used resolutions and will immediately resize the window to that resolution so you don't need to click Set.
If you want to resize to a resolution that's not in the tree, simply specify it under New resolution to set by filling in the Width and Height textboxes, and click Set.
Hotsampling resizes the game's resolution to the value you've specified. This might mean the resolution you've chosen is too high for your hardware and the game will run very slow or even crash. So it's recommended to first take small steps before cranking up the resolution to a high value as you might lose that unique shot that took so long to setup.
Running as 'full screen'
To run the game in the full resolution of your monitor, but still as windowed, click the Fake fullscreen button. This will resize the window of the game to the size of your monitor and will resize the resolution of the game to the resolution of your monitor as well.
Alignment controls
If you resized the window to a resolution much bigger than your monitor, you can't check if everything rendered alright. To do that click one of the buttons in Alignment controls, to move that part of window to the monitor area. So clicking Left will make the left side of the window visible on your monitor, and so on.
Log
The Log tab is the tab which gives you more information about what the system is doing, and whether there are errors. It also allows you to disable notifications for e.g. camera enabled/disabled.
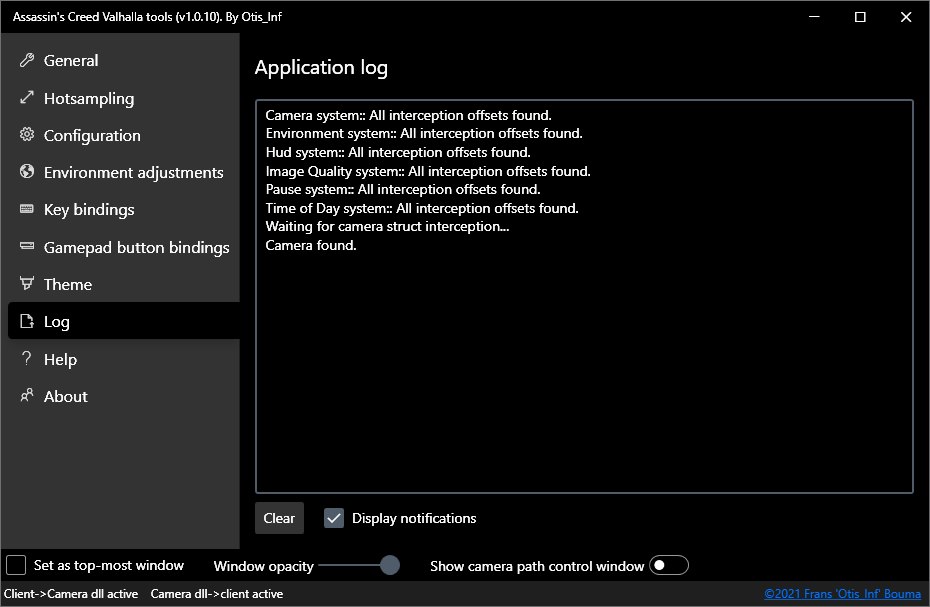
The Log tab
If the game is updated and the photomode mod might be out of date, the Log tab will tell you.
Help
The Help tab gives you more information about controls and how to use the client. It can be very useful when you don't have this guide handy but want to know more about e.g. the controls.
Controls
The default photomode mod controls are listed below. It depends on the Camera control device setting on the Configuration tab whether the device (e.g. mouse or gamepad) can control the camera.
All the sliders are reset to their default value if you double click them.
Mouse
When moving the mouse:
- No mouse buttons pressed: rotate the camera
- Left button pressed: move camera up / down / left / right
- Right button pressed: move camera forward / backward / left / right
- Both left and right button pressed: tilt camera left / right
- Mousewheel: increase / decrease Field of View (FoV)
Keyboard
Normal camera usage
| Key | Feature |
|---|---|
Insert |
Enable / Disable the camera |
Numpad . |
Block / Unblock input to game |
Numpad - |
Decrease FoV |
Numpad + |
Increase FoV |
Numpad * |
Reset FoV |
Home |
Lock / Unlock camera movement |
Numpad 4 |
Move camera left (+ Ctrl: slower, + Alt: faster) |
Numpad 6 |
Move camera right (+ Ctrl: slower, + Alt: faster) |
Numpad 8 |
Move camera forward (+ Ctrl: slower, + Alt: faster) |
Numpad 5 |
Move camera backward (+ Ctrl: slower, + Alt: faster) |
Numpad 7 |
Move camera up (+ Ctrl: slower, + Alt: faster) |
Numpad 9 |
Move camera down (+ Ctrl: slower, + Alt: faster) |
Numpad 4 |
Move camera left (+ Ctrl: slower, + Alt: faster) |
Arrow key Up |
Rotate camera up (+ Ctrl: slower, + Alt: faster) |
Arrow key Down |
Rotate camera down (+ Ctrl: slower, + Alt: faster) |
Arrow key Left |
Rotate camera left (+ Ctrl: slower, + Alt: faster) |
Arrow key Right |
Rotate camera right (+ Ctrl: slower, + Alt: faster) |
Numpad 0 |
Pause / Unpause the game |
Page down |
Skip a few frames when paused |
Numpad 1 |
Tilt camera left (+ Ctrl: slower, + Alt: tilt 90 degrees left) |
Numpad 3 |
Tilt camera right (+ Ctrl: slower, + Alt: tilt 90 degrees right) |
Numpad 2 |
Reset tilt |
Delete |
Toggle HUD |
, |
Set Time of Day earlier (+ Alt: slower) 1 |
. |
Set time of Day later (+ Alt: slower) |
Camera path usage
| Key | Feature |
|---|---|
F7 |
Start / pause playback |
F8 |
Stop playback |
F4 |
Add path |
Ctrl-F4 |
Delete active path |
F10 |
Add node to active path |
Ctrl+F10 |
Replace the active node on the active path |
Alt+F10 |
Insert a new node in front of the active node on the active path |
Shift-F10 |
Insert a new node after the active node on the active path |
Ctrl-F9 |
Delete active node on the active path |
Ctrl+Home |
Go to start of active path |
Ctrl+End |
Go to end of active path |
Ctrl+Page Up |
Go to previous node on active path |
Ctrl+Page Down |
Go to next node on active path |
Numpad 1 |
Select the first path during playback (if any) |
Numpad 2 |
Select the second path during playback (if any) |
Numpad 3 |
Select the third path during playback (if any) |
Numpad 4 |
Select the forth path during playback (if any) |
Numpad 5 |
Select the firth path during playback (if any) |
Numpad 6 |
Select the sixth path during playback (if any) |
Numpad 7 |
Select the seventh path during playback (if any) |
Numpad 8 |
Select the eighth path during playback (if any) |
Numpad 9 |
Select the ninth path during playback (if any) |
Gamepad
Normal camera usage
| Control | Feature |
|---|---|
| Left stick | Move camera forward / backward / left / right |
| Right stick | Rotate camera |
| Left trigger | Move camera up |
| Right trigger | Move camera down |
| Y button + left / right stick | Faster movement / rotation |
| X button + left / right stick | Slower movement / rotation |
| D-pad up / down | Increase / decrease FoV |
| B button | Reset FoV |
Camera path usage
| Control | Feature |
|---|---|
| Start | Start / pause playback |
| Back | Stop playback |
| Left bumber | Go to previous node on active path |
| Right bumper | Go to next node on active path |
| A | Add node to active path |
-
Some photomode mods don't offer Time of Day control, e.g. because the game doesn't offer this feature. In these cases these controls aren't available. ↩