Versions and compatibility
| Latest version | v4.11.5 |
| Released on | 07-nov-2025 |
| Compatible with | Games using Unreal Engine v4.11 and later. |
| Hotsampling via | Running the game in windowed mode |
| Supports IGCS Connector | Yes, v2.0+ |
| Supports IGCSDOF | Yes |
| Download latest version | Post on patreon |
Universal Unreal Engine 4 Unlocker (which uses version numbering v4.x, described on this page) is for games using Unreal Engine v4.11 or higher. Universal Unreal Engine 5 Unlocker (which uses version numbering v5.x, described elsewhere on this site) is for games using Unreal Engine v5.1 or higher.
Features at a glance
The Universal Unreal Engine 4 Unlocker (in short: UUU) offers the following features:
-
Full, unlimited camera control (gameplay, cutscenes)
- Controller or mouse/keyboard control over the camera
- Field of view (FoV) control
- Tilt
- Camera shake controls in both manual movement (for hand-shot videos) and camera paths.
- Camera paths support ('dolly cam') for defining moving camera trajectories for movies.
- Infinite custom spotlight and pointlights
- Multiple timestops (slomo 0 based, and UWorld::IsPaused based)
- Frameskip
- Engine Console for specifying tweaks and UE4 commands
- HUD toggle (AHud and UWG/Slate widget based)
- Hotsampling (resize the game window to any resolution)
- Post-processing effect control
- Ability to dim existing scene lights
- Ability to toggle visibility of your game character
- Ability to reposition / rotate your game character
- Pillarbox/letterbox removal in custom aspect ratios
- Game speed control (slow-motion, speed up)
- Invulnerability for your character
- Ability to pose skeletal mesh actors
- Ability to select, move, rotate, scale, hide and clone any actor (static mesh or skeletal mesh actor)
- Ability to control the animation speed of NPCs/characters in the game, including pausing
- Ability to dump the UE4 object store contents in detailed format to a text file
- Ability to dump all cvars/console commands with current values and help text to a text file or json file
- Ability to use the 'SET' command in the console
- Unlocks readonly cvars and console commands
- Configurable input interpolation for smooth camera movement/rotation/fov zoom in/out
- Per game configuration persistence, so you can use different settings for each game.
- Three slots to save camera state (location/orientation/fov) for quickly switch between them
- Configurable keybindings
- Configurable gamepad buttonbindings
This page is for the UUU v4.x. If you are looking for the information for the free UUU v3.x, please go to the UUU v3 page on the Framed site
The UUU v4.x is a continuation of the core internals of the UUU v3, so it should work with all games the UUU v3 works with.
How to use
Please see for details how to get started and configure the UUU, General features and configuration. This guide will provide additional information for the controls / features specific for the UUU.
If you click Select and the game process isn't shown, even though you know it's running, it's likely the game runs as administator and you therefore have to run the UuuClient.exe also as administrator: right-click the UuuClient.exe and select 'Run as Administrator' or create a shortcut to the exe on your desktop, right-click it, select Properties and on the Shortcut tab, select Advanced..., then check the 'Run as Administrator' checkbox and click OK.
After injecting the DLL
After you've successfully injected the dll, you'll get a series of notification windows in the top left corner of your game window which some info regarding what the UUU is doing. You can now switch to the Available features tab to see which features of the UUU are available with the game you're using it with.
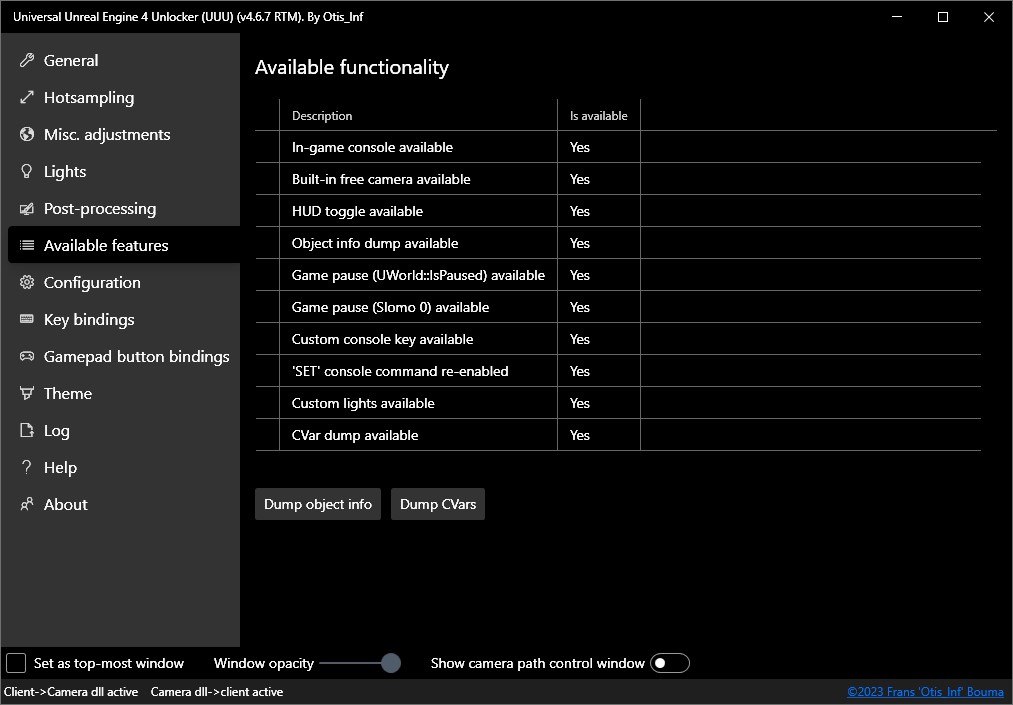
Here, with Darksiders III as example game, all features are available.
The Dump object info button can be used to dump all active object names, their structure, functions, properties and the addresses in memory to a text file on disk. This feature is helpful for people who want to use cheat engine with the game at hand. See for more info the object dumping section below.
The Dump CVars button can be used to to dump all available cvars (console variables) and console commands, with their names, current value (in the case of cvars) and the help text associated with them, to a text file. This can help with tweaking games using the console. See for more info the cvar dumping section below.
It might be the UUU reports some elements aren't found while the game should be fully supported. This might be caused by assembly mismatches or the timing you injected the dll into the game process. If this happens try to inject the DLL at moment after you've loaded the level or after the game's menu has fully loaded.
Game behavior options
Key selection for opening the in-game console
It might be the ~ key doesn't do anything, even though the console was created successfully by the dll. This might be caused because the game unbound the ~ key and therefore it's not possible to open the console. Additionally, you might be using a non-US keyboard, like an Azerty keyboard, and on those keyboards, the ~ key isn't above the TAB key and the engine won't recognize it.
To correct this, on the Configuration tab, the setting Key to open in-game console allows you to select from a small set of keys what to use to open the console. By default this is 'Tilde' (~). Please select a key that's on your keyboard and which doesn't need Shift to be selected. E.g. on a French (Azerty) keyboard, the '$' key is a good choice, so choose in the drop down Dollar ($) as console key.
Block focus loss method
It might be the game shows the menu when you alt-tab to another window. To prevent this, the UUU has two methods to block the notification to the game window that you've alt-tabbed away, and they're named Method A and Method B. In general, if your game doesn't show the menu when you alt-tab away to another window, leave this option to None. Method A uses a simple block mechanism inside the engine and keeps telling the game that it has the focus. It depends on the game if this works or not, but if it does, it likely doesn't lead to any glitches so first try this method.
Method B is a method that fairly often works, but also could lead to glitches in some games. If your game shows the menu when alt-tabbing away, and Method A doesn't fix it, try to use Method B.
These methods take effect as soon as you alt-tab back into the game and remove the menu manually by e.g. pressing ESC. Alt-tabbing away after that shouldn't show the menu.
Slomo pause type
By default the UUU selects the MatineeTimeDilation value in the engine for pause. This works for the majority of games. However sometimes this value doesn't work or gives odd results and instead it should choose the TimeDilation value to pause the game. This option allows you to change this manually: choose TimeDilation if the game doesn't work or behaves wrongly when pressing the PageDown key to pause the game.
Use engine default for slomo min. value
By default the UUU pauses the engine with a (matinee) time dilation of 0.0. However some games crash with that value. In that case, please check this checkbox to make the UUU use the engine's default minimum value which is usually 0.0001. The UUU doesn't use this as the default because in some games a value of 0.0001 causes cloth/hair physics to go bezerk. And we can't have bezerk hair/clothing, it's not the 1990-ies anymore!
Aspect ratio axis constraint method
When the aspect ratio changes (e.g. you resize the window or the UUU removes the letter/pillar boxing constraints), the engine will either extend the image in the horizontal direction or vertical direction or keep the same image and zoom in. You can control what happens with this setting.
By default Unreal Engine v4.x uses Maintain X (horizontal) FOV, so the game zooms in when the aspect ratio becomes wider and zooms out when the aspect ratio becomes narrower. This might not be a good fit for your monitor setup with a particular game. With this setting you can override what the game is doing and control it yourself.
Saving the current configuration as the default settings
On the Configuration tab you'll find the Save configuration as default button. This button will save the current configuration (settings, key bindings, gamepad bindings, theme) as the default for the UUU, so it'll use these settings next time you use the UUU with a game you haven't used the UUU with before. It's not going to overwrite the settings for games you already have used with the UUU, as these have their own settings already set.
Opening the in-game console
In-game, press the ~ key (it's the key above the TAB key on your keyboard), or the key you configured if you're on a non-US keyboard.
This should give a small line at the bottom of the game screen in which you can type commands.
If you type the ~ again you'll get a larger console window which also shows the response of the game on your commands.
To do useful things like starting the debug camera, in a lot of games you first have to enable the cheats in the game. To do this, type EnableCheats 1 in the console and hit enter. After that, type toggledebugcamera after you've loaded a level. This should give you the ability to move the camera around using your controller and WASD + mouse. This can be a good alternative for when the built-in camera of the UUU isn't available.
To go back to the game, type again toggledebugcamera in the console or simply press cursor UP to go to a previous command. There are many commands to choose from. Not all of them work. E.g. god or fly might say they're activated but chances are they're not doing anything. Commands like fov 50 (to set the FoV to 50 degrees, default is likely 80), pause (to toggle the pause of the game) and a lot of console variables do work.
For more information about tweaking UE4 games, please see the Tweaking Unreal Engine 4 Games guide on the Framed Screenshotting Community site for more info about what commands you could use to make the game look even better.
What to do when the console doesn't open
It might be the ~ key doesn't do anything, even though the console was created successfully by the dll. This might be caused because the game unbound the ~ key and therefore it's not possible to open the console. Additionally, you might be using a non-US keyboard, like an Azerty keyboard, and on those keyboards, the ~ key isn't above the TAB key and the engine won't recognize it.
To correct this by choosing a different key to open the console, please see the Configuration section above.
Setting the console key in the game's ini files
Alternatively, you can add a custom console key to the game's ini file. This doesn't always work, but it's worth a try if you want to use another key than is available in the menu. Follow these steps
- In explorer go to:
c:\users\<your username>\AppData\Local\<game name>\Saved\Config\WindowsNoEditor - open Input.ini
- Add (pay attention to the empty line, that has to be there):
[/Script/Engine.InputSettings]
ConsoleKey=Tilde
- Save and set the file to readonly. You can also set it to another key, e.g. K.
Console tricks
The Unreal Engine console supports copy / paste of text. This is a great help if you want to execute multiple commands and have to type them in every time.
Additionally, it supports multiple commands on the same line, where you separate the commands with the | character. Combined with copy/paste you can
create long strings of commands in a text file and copy/paste them over to execute all the commands in one go.
Examples:
showhud 0|fov 60|pause|toggledebugcamera|r.postprocessaaquality 2
This hides the hud, sets fov to 60, pauses the game, enables the debug camera and sets the AA to a lower quality so you don't have jitter blur.
The console also remembers a history of commands, and keeps the line with multiple concatenated commands as one line. To show the history, press the arrow-up key in the console.
Misc. adjustments
The UUU offers some extra features for your game:
- Game speed
- Enabling this setting will allow you to control the game speed. This is similar to specifying
slomowith a value on the in-game console, e.g.slomo 0.2will run the game at 20% of the full speed. It is only available if the Slomo pause is available (see Available features). A value of 1.0 is 'normal game speed' and a value of 0.0 is total pause. - Npc animation speed
- Enabling this setting will allow you to control the animation speed of NPCs / other characters in the game. A low value will make them go very slowly, a high
value will make them go very fast. To pause the NPCs, press the NPC pause key, by default that's
END. Please see the note below about caveats. - Player size
- Enabling this setting will allow you to shrink or enlarge your player's character in-game. Setting the slider all the way to the left (the minimum value) will make your character
(almost) disappear. Use this to hide your character. To make the setting take effect, the game has to receive input to move the character. If you have paused the game already,
press e.g.
Wor the left stick forward and after it the key for frameskip (defaultPageUp). - Existing game light intensity percentage (UE4.17+)
- Enabling this setting allows you to dim existing scene lights to the percentage you've specified. So if you set the slider to 10%, it'll dim all scene lights to 10% of their original intensity. This feature works in games using UE4.17+. This means that e.g. in Days Gone this feature won't have any effect. It might take a short period of time before the UUU has collected all lights in a scene so be patient. Some games bug with this feature and show only darkness immediately after enabling the toggle. The main purpose of this feature is to be able to add your own custom lighting to a scene using the Lights feature of the UUU.
- Toggle player visibility:
- This toggles the player's 'actor' pawn's visibility, as well as the visibility of directly attached 'actors' like weapons. It might be effects and other elements might not hide, but it depends on the game. The player isn't hidden for enemies, the visible representation (e.g. your character) isn't rendered
- Make player invulnerable
- This setting might not work in all games. It disables the flag that your character can receive damage, but some games have implemented this differently and in these games it has no effect. You can use this to create better action shots.
Npc animation speed might crash your game or cause enemies to disappear. It's key to first use the Npc animation speed before pausing Npc's as it might be the game you're using the UUU with can't deal with an animation speed of 0. It also might be the feature doesn't affect certain characters in your game. This is likely because these characters aren't deriving from the Unreal Engine's Pawn class.
If you pause NPCs and new NPCs are spawned, these aren't paused. This is because the UUU first grabs all existing NPCs and then pauses these. New NPCs spawned after that won't be affected.
Post processing (UE4.17+)
This feature won't work in games which use Unreal Engine v4.16 or lower, so e.g. in Days Gone these features have no effect. Additionally, in games like Final Fantasy VII Remake, many of the features won't work because they're implemented with a custom pipeline by the developers of the game and these bypass the UE4 effects. Just try and experiment which feature has an effect in your game.
The post-processing tab offers a way to control a variety of post-processing effects of the engine. It depends on the game's engine version (the higher, the better), and if the game uses a given feature to make a setting have any effect. Below are the settings available to you through the UUU and what they mean.
The Depth of field settings work on the 'Diaphragm Depth of Field effect' of Unreal Engine, which is the default Depth of Field effect starting with UE4.24 and which has been used by games using older versions (e.g. Final Fantasy VII Remake). It therefore depends on whether the game uses this Depth of Field effect to have these settings have any effect in-game. Additionally, some games remove the Depth of Field effect from the camera's post processing pipeline during gameplay, like in Final Fantasy VII Remake, so enabling them in these cases also has no effect.
If the Depth of Field settings have no effect in your game, chances are it uses the older, inferior Circle Depth of Field effect of UE4 and you're better off using Reshade's Depth of Field
effects anyway, like my Cinematic DOF. To disable the depth of field effect of a game, use r.depthoffieldquality 0 on the
console.
- White balance
- This controls the white balance of the image. Lower values result in a more blue image, higher values result in a more yellow image.
- Tint
- This controls the tint of the image. Lower values result in a more greener image, higher values result in a more redder image.
- Auto exposure bias
- This controls the logarithmic adjustment for the exposure. Only used if a tonemapper is specified. 0 means no adjustment, -1 means 2x darker, -2 means 4x darker, 1 means 2x brighter, 2 means 4x brighter etc.
- Color grading intensity
- This controls the color grading LUT intensity, if used by the game. 0 means no color grading, 1.0 means full color grading.
- Lens flare intensity
- This controls the intensity of the lens flares. 0 means no lens flares. The higher the value, the more prominent the lens flares.
- Tone Curve amount
- This controls the amount of tone curve to apply. 0 means no tone curve, 1.0 means the full tone curve is applied.
- Bloom dirt mask intensity
- This controls the intensity of the lens dirt texture. 0 means no lens dirt/smudges, the higher the value the more prominent the lens dirt/smudges will be, if set by the game.
- Bloom intensity
- This controls the intensity of the bloom. 0 means no bloom, the higher the value the more intense the bloom will be.
- Chromatic aberration intensity
- This controls the chromatic aberration (CA) that's visible. 0 means no CA is visible, the higher the value the more prominent the CA will be.
- Chromatic aberration start offset
- This controls where the chromatic aberration (CA) will start: 0 means at the edge of the screen (so it's not visible), 1 means at the center of the screen. Only useful if Chromatic aberration intensity is set to a value bigger than 0.
- Depth of field focal distance
- This controls the depth of field focal distance, in cm. Use the numeric textbox to control the max value of this slider. Only works if the game uses a recent UE4 version (v4.24+) or has enabled the Diaphragm DOF effect.
- Depth of field f-stop
- This controls the depth of field aperture / f-stop value. The lower, the more blur you'll see. 0 switches off the Depth of Field effect. Only works if the game uses a recent UE4 version (v4.24+) or has enabled the Diaphragm DOF effect.
- Depth of field blade curve min f-stop
- This controls the depth of field blade curve value. The lower, the more prominent the shutter blades will be in the highlights. Only works if the game uses a recent UE4 version (v4.24+) or has enabled the Diaphragm DOF effect.
- Depth of field shutter blade count
- This controls the number of blades used in the bokeh highlights. Requires focal distance / f-stop to be enabled. Only works if the game uses a recent UE4 version (v4.24+) or has enabled the Diaphragm DOF effect.
- Grain intensity
- This controls the amount of film grain visible in the image. 0 means no grain, 1 means maximum grain.
- Indirect lighting intensity
- This controls the indirect lighting contribution to the scene. 0 means no global illumation, the higher the value the more GI will contribute to the overall lighting.
- Screen space reflection quality
- This controls the screen space reflection quality of the scene. Only effective if the effect is used by the game.
- Screen space reflection intensity
- This controls the screen space reflection intensity of the image. Lower values make reflections less prominent. Only effective if the effect is used by the game.
- Screen space reflection max roughness
- This controls the maximum roughness used by the screen space reflection. Only effective if the effect is used by the game.
- Vignette intensity
- This controls the vignette intensity. 0 means no vignette, 1 means a heavy vignette.
Double clicking the slider's button will reset it to its default value.
To toggle all features on / off, use the Toggle all on / off buttons at the bottom.
Multiple game pause/timestops
The UUU has two ways to pause the game: using the normal UWorld::IsPaused hack, (Numpad 0), and one using the slomo command code, (Page down).
You can use either one, if they're both available/found. Numpad 0 is a hard-pause which could lead to TAA jitter in the scene.
You can remove that by stepping down the AA a bit, using the following command on the in-game console: r.postprocessaaquality 2 in the console.
To set it back, use r.postprocessaaquality 6. The downside of that is that cutscenes might play on and the lower quality AA might remove some effects.
The slomo based pause using Page Down doesn't suffer from TAA jitter, and can pause most, if not all, cutscenes as well (except audio in some
situations). In general, if the latter is supported, you should use the slomo based pause.
If both don't work, you can try pause on the in-game console. pause isn't an official command but a lot of games support it in one way or the other.
Lights
Starting with v4.1, the UUU offers the ability to create an infinite number of custom lights in a UE4 game. If the feature is available in the game, you can use the Lights tab to create new SpotLights and PointLights and edit their characteristics. A SpotLight is a light which shines a cone of light in one direction and a PointLight is a light that shines light in all directions.
You can create and edit lights in both the client and the in-game overlay. This section is about the client's light features. For the in-game lights section please see further down this documentation.
The Lights Tab
The screenshot below shows an example where two SpotLights have been created
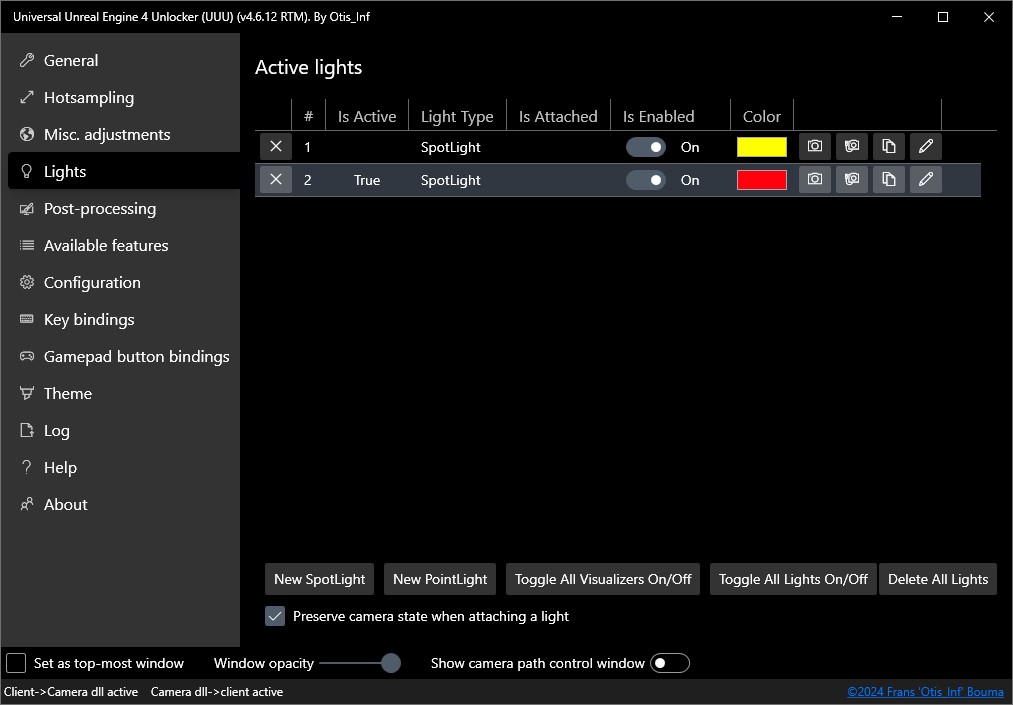
The grid shows the following columns:
- Is Active
- This column shows which light is the 'active' light for keyboard shortcuts. The light which has 'True' in this column is affected when you press one of the keyboard shortcuts that work on an existing light, like attach to camera.
- Light Type
- The type of the light, be it SpotLight or PointLight
- Is Attached
- Each light which is attached to the camera has a toggle button shown in this column. You can use this toggle button to detach the light from the camera. When doing so and you left the option Preserve camera state when attaching a light checked, then the camera will move to its original position (unless the free camera isn't active).
- Is Enabled
- This column contains a toggle for each light to switch it off and on
- Color
- This column offers a color editor for quickly changing a light's color without going into the light editor.
Additional to these columns, the last column contains four buttons per light:

- This button will move the camera to the light and attach the light to the camera. This will mark the light as 'active'.
- This button will move the light to the camera and attach the light to the camera. This will mark the light as 'active'.
- This button will create a copy of the light at the position of the camera.
- This button opens the light in the Light Editor and marks it as 'active'.
The buttons that attach a light to the camera will preserve the original camera position, if the option Preserve camera state when attaching a light is checked. The camera will return to that position when you detach the light from the camera. Attaching a light to the camera gives fine-grained control how to position the light.
When you have a light attached to your camera and you move it around, it might be the engine will stop updating the light in the 3D world. To fix this, switch the light off and on again (yes, really) and the engine will restart rendering it. Use the toggle under Is Enabled for that.
At the bottom of the Lights tab the following options are available:
- New SpotLight
- Clicking this button will create a new SpotLight at the location and rotation of the camera using the default values.
- New PointLight
- Clicking this button will create a new PointLight at the location and rotation of the camera using the default values.
- Toggle All Visualizers On/Off
- This button will toggle the visualizers for each light on or off. It depends on the engine version your game is using whether this option is available. Games using Unreal Engine v4.25 or higher should offer support for this. If the button isn't enabled, your game doesn't support light visualizers. Light visualizers are off by default.
- Toggle All Lights On/Off
- This button will toggle all lights you've created on or off.
- Delete All Lights
- This button will delete all lights you've created. It'll ask for a confirmation first.
- Preserve camera state when attaching a light
- Checking this checkbox will perserve the camera position and rotation when you attach a light to the camera. It's then moved back to its original position when you detach a light.
When you're done with a scene and thus your lights are no longer of value, it's highly recommended to delete them. It might be the existing lights will keep the game from loading another level or might even crash.
When you create a new light and it doesn't seem to affect some elements in the world, e.g. your character is unaffected by it, please check the light channels
The Light Editor
When you click the Edit Light button of a light in the Lights tab, it is opened in the Light Editor. The Light Editor looks like the following screenshot:
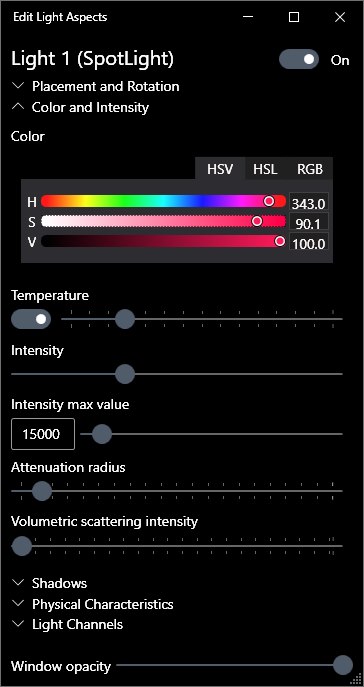
The Light Editor has many controls, which you can view by expanding the various parts, like Placement and Rotation, Shadows etc. The Light Editor remembers what you have expanded so next time you open a light in the Light Editor, you don't have to expand all groups again.
The Light Editor offers the features as available in UE 4.26. It might be your game is built with a (much) older UE 4 version, and therefore not all features will work. It goes too far to list for each feature when it's supported, so a bit of trial/error is required. The basic features like color, intensity, placement and the like are always supported.
The Light Editor offers several numeric textboxes like the x/y/z coordinates. To change these, click inside these textboxes and use your mousewheel to change these values quickly. Hold Shift while using the mousewheel to change the value with bigger steps, hold Control while using the mousewheel to change the value with small steps.
The Light Editor offers the following functionality:
Placement and Rotation
Placement
X and Y are horizontal, so changing X and / or Y will move the light in a horizontally direction. The X and Y coordinate are relative to the world, not to the camera. Z is up, so making Z smaller will move the light down, making the value bigger will move the light up.
- X
- This is the x coordinate of the location of the light.
- Y
- This is the y coordinate of the location of the light.
- Z
- This is the z coordinate of the location of the light. (Up)
Rotation (Spotlight only)
The angles are in degrees, so 0 and 360 are the same position. If you move the slider of an angle to either the start or the end, you should continue on the other end of the slider. So moving the slider to 0 (the left edge, or start of the slider) makes you can't go any further as the slider stops at the left edge. To rotate the light further in the world, you should move the slider all the way to the right (360 degrees) and then slide the slider to the left.
- Pitch
- This is the angle to rotate the light up or down. 0 is straight down, 180 is straight up.
- Yaw
- This is the angle to rotate the light left or right.
- Roll
- This is the angle to rotate the light along itself. This angle is usually 0, and only used if you use the source radius settings (further below), so you can rotate the reflection.
Color and Intensity
- Color
- This color editor allows you to edit the color of the light using HSV, HSL or RGB editors, whatever you prefer. See the Wikipedia article about what HSL and HSV means.
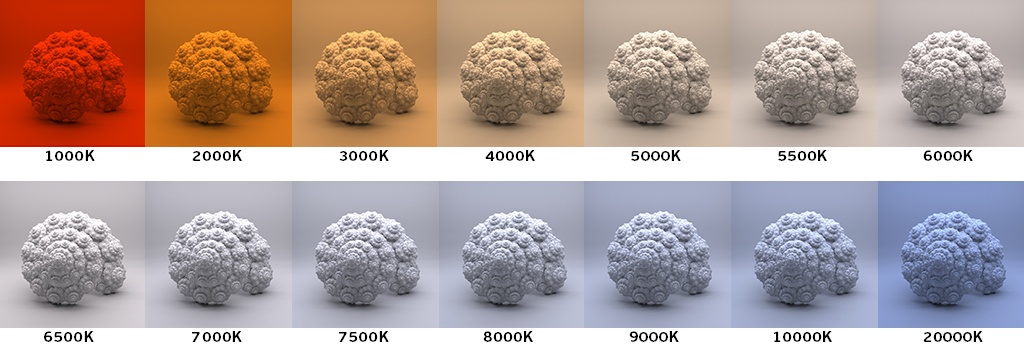
- Temperature
- When enabled allows you to specify the temperature of the light, from 1000 Kelvin to 15000 Kelvin. This is additionally to the light color and can change how a light's color will look. See the chart below what temperature does to a white light. It's recommended to first use the temperature slider to set your light's color, unless you're going for a light color that's not achievable with the temperature slider. The main reason for this is that temperature changes won't affect the luminosity of the light, while color changes do.
- Intensity
- The brightness of the light. The maximum value of this slider is controlled by the Intensity max value slider.
- Intensity max value
- The maximum value of the Intensity slider. To be able to have fine-grained control over the Intensity value, the maximum is configurable.
- Attenuation radius
- This slider controls how far in the world the light will affect geometry and models. The higher the value the more will be lit by the light.
- Volumetric scattering intensity
- This is the amount the light affects the fog that's in the world. It might be this option doesn't do anything, because there's no fog volume in the game at the light's location.
Shadows
- Cast shadows
- This checkbox toggles shadow rendering of the light. Off means no shadows at all.
- Cast deep shadows
- This checkbox toggles deep shadow rendering, which is used on some hair rendering techniques in UE4. Only present in newer engines and the game must use the hair rendering system of UE4.
- Cast raytraced shadows
- This checkbox toggles whether the shadows cast by the light are done by raytracing. This requires the game to have raytracing enabled, which is available in v4.25+.
- Cast volumetric shadows
- This checkbox toggles whether the light will cast volumetric shadows in fog volumes when the Volumetric scattering intensity is set to a value that makes the light show a light beam.
- Shadow bias
- This controls one of the two shadow bias values. In general: if the light is close to the object that's shadowed, setting this to a lower value gives sharper shadows and no banding. See the Unreal Engine documentation for more details
- Shadow slope bias
- This controls one of the two shadow bias values. See the Unreal Engine documentation for more details
- Shadow Resolution Scale
- Scales the resolution of shadowmaps used to shadow this light. By default shadowmap resolution is chosen based on screen size of the caster.
Constrained by the value set to
r.Shadows.MaxResolution. - Contact Shadow Length
- Length of screen space ray trace for sharp contact shadows. Zero is disabled. See the Unreal Engine documentation for more details
Physical Characteristics
SpotLight specific
- Inner cone angle
- Sets the inner cone angle of the SpotLight, in degrees.
- Outer cone angle
- Sets the outer cone angle of the SpotLight, in degrees. Setting this value the same as the Inner cone angle gives a hard edge on the light's circle.
Settings for all light types
- Source radius:
- The radius of the light source shape. Mostly used for the reflection of the light itself
- Soft source radius
- The radius of the soft edge of the light source shape. Mostly used for the reflection of the light itself
- Source length
- The length of the light source shape. Mostly used for the reflection of the light itself
- Specular scale
- The scale of reflection of the light source shape. Setting this to 0 will mean the light isn't reflected at all.
- Affect dynamic indirect lighting
- Whether the light is added to the dynamic indirect light already in the scene
- Affect transluent lighting
- Whether the light is added to the light through transluent/ transparent objects.
- Affect global illumination
- Whether the light affects global illumination. Only in effect if the game uses a dynamic GI system.
- Affect reflection
- Whether the light is added to the reflections in surfaces. This isn't the light bulb itself, but the lit elements lit by the light.
Light channels
Light channels are a way for UE4 to control which lights affect which objects in the world. A light that has only its Light channel 0 checkbox checked, won't affect any object in the world that's set to light channel 1 or 2. By default a light is placed in the light channel 0 (unless the game puts all lights in specific channels). E.g. if your light doesn't affect your character (e.g. in Darksiders III, the player's character is on Light channel 1), check the checkboxes of the other light channels to have the light affect the character.
Light visualizers
See for light visualizers the section in the in-game overlay part of this documentation.
Further reading
Lighting is a complex topic and it can help to read a bit more about how lights work in UE4. The lights created by the UUU are movable lights and the documentation about movable lights in UE4 applies to these lights.
Player pawn movement
Starting in v4.5, the UUU offers the ability to move your player pawn, the in-game character when the camera is active. This can be particularly handy when you have paused the game but your character is not really in the right spot. This feature is only available when the camera is active so you can't use this to 'teleport' to another location on the map.
Player pawn movement and rotation has been implemented for mouse and gamepad. If you have the camera device set to gamepad, you can use the gamepad for moving/rotating the player pawn. If you have set the camera device to 'keyboard/mouse', you can use the mouse to move / rotate the player pawn. If you have set the camera device set to 'both' you can both use the mouse or gamepad to move / rotate the player pawn.
Caveats
- It might be your player pawn moves but some part is stuck on the old location. This isn't solveable. After moving / rotating, press the Skip Frame button to quickly unpause/pause again.
- Some games don't let you rotate the player pawn when it's doing an animation. This isn't something the UUU can fix.
- Moving the player pawn when the game isn't paused will continue to apply physics on the character, so trying to move the character up or down likely won't work. Instead pause the game and then try to move the character up/down.
Gamepad
To enable move / rotate mode for gamepad, press the A button (or X on a Playstation controller) together with rotation left/right stick and/or using the triggers. Releasing the A button will make the gamepad move the camera again.
So e.g. to move your player pawn a bit to the left, hold A plus push the left stick to the left. To get fine-grained control over movement also press X (or [] on a Playstation controller) to slow the movement. To move the player pawn up or down use the left or right trigger. For rotations, instead of using the left stick, you use the right stick.
Mouse
To enable move / rotate mode for mouse, press the Shift key on your keyboard together with moving your mouse and pressing no button or the left mouse button or the right mouse. Releasing the Shift key will make the mouse control the camera. The movement is the same as when controlling the camera with only the mouse. Holding Ctrl will give you fine grained control over the movement and rotation.
So like the example with Gamepad above, to move your player pawn a bit to the left, hold Shift while holding the left or right mouse button and move the mouse to the left.
The in-game overlay
Starting with the UUU v4.7.0, the UUU now offers an in-game overlay which can be opened by pressing Ctrl-Insert. If you have bound another key to
camera enable, you have to press Ctrl and that key.
The in-game overlay offers a limited set of the same features available through the keyboard as well as a way to manipulate elements in the game world.
While I've spent considerable time to test this feature and iron out all the different quirks for various games, it's not unlikely you will run into crashes when e.g. changing the skeletal mesh of a character or change the animation. These crashes are likely related to game code and there's no fix.
Additionally, various versions of Unreal Engine introduced different features and fixes for long standing bugs so for e.g. older games, playing an animation on an in-game character will make it T-pose when you disable the camera. The overlay will mention this and will only allow custom animations on a clone of the character. This is easy to do by clicking the 'Clone and hide original' button. I've run into some games where cloning the main character however caused crashes so for some games you sadly will run into problems either way.
Unreal Engine uses a strict garbage collection system in memory which means if something isn't used anymore, it'll be 'removed from memory'. This might be the case if you e.g. set your character's skeletal mesh to something else so the original skeletal mesh isn't used anymore in the game world. It might then result in a crash when you disable the camera/reset the actor, as the UUU doesn't know the original skeletal mesh has been removed and tries to set the actor to that (now removed) original skeletal mesh. So changing skeletal meshes is best done on clones.
When disabling the camera, your changes will be erased and the world state will be restored as-is. It might be some characters will T-pose or A-pose if you have changed their animations. This isn't fixable and is described in detail below.
The overlay has a resizable window with three tabs: Camera, Actor selection and manipulation and Pause / Gamespeed. You'll see ? icons on various places; please hover over these icons to get more info about a feature.
The Camera tab
The Camera tab contains basic controls over whether the camera is enabled, the FoV, roll/tilt and temporary storage of camera state (which are also available through Ctrl-F1/F2/F3).
The Actor selection and manipulation tab
All elements in a gameworld in Unreal Engine are an 'Actor', the enemies you fight, the walls, the floor, everything. You can select them by clicking them in the world. You'll see the selected elements in the list of Selected actors. The UUU offers features for two type of actors: static mesh actors (e.g. walls, floors, trees) and skeletal mesh actors (e.g. enemies, your character). By default Unreal Engine doesn't mark static mesh actors as moveable, which means you can't rotate/move them. To make that possible, you have to check the Is movable checkbox for the particular actor.
In a cutscene it might be you can't select an actor at all or only some static geometry that's clearly behind the character you clicked on. This is due to the engine using a sequence player which spawns the actors in its own world, unreachable for the UUU. At the moment there's no way to obtain these actors to manipulate their poses or location.
Editor gizmo's
To view an editor gizmo on the selected actor, check the Show editor gizmo on selected actor checkbox. This will show a 3D editor (a 'gizmo') on the selected actor to move and rotate the actor
directly in the 3D world. If you need the gizmo to be more transparent press Ctrl-Shift-T (you can bind another key to this if you want in the keybindings in the client) to toggle
more or less transparency for the gizmo. An actor has to be marked moveable to have the gizmo show up.
Editor gizmo's are available in games using UE 4.24 or later. Earlier versions of the engine lack important functions used to calculate required data for the gizmo to be properly rendered.
Posing a character (Skeletal mesh actors)
To change the pose of your character and even resize elements of a skeletal mesh actor (e.g. your character or an enemy), you can open the pose editor for a skeletal mesh actor after you've selected it, by clicking Show pose editor. This will open the Pose editor. The pose editor is described in more detail further below.
Changing the skeletal mesh/animation (Experimental options)
This feature is marked Experimental because of the issues that can arise when changing meshes/animations during a gameplay session. This is also documented in the overlay when you click open the 'Experimental options' heading
In Unreal Engine, a skeletal mesh actor (e.g. your character) in general has one 'Skeletal mesh component', the 'Component' mentioned in the overlay GUI. Sometimes games build their skeletal mesh actors with multiple components, e.g. the main skeletal mesh component for the body, arms, legs etc. and another for the head, sometimes another for hats, hair and the like.
The UUU overlay allows you to change the aspects of each of these components separately. This means that you can change the animation that's playing on the main component, but also the one that's playing on the face component for instance. Keep in mind that the UUU filters animations based on the skeleton associated with the component. Sometimes the different components all have the same skeleton, which means the same meshes and animations are listed with the different components. This makes it a bit more difficult to find the right animation or mesh for the current actor, however there's no fix for this.
Changing the skin/mesh for a skeletal mesh actor requires the camera to be active. Once you've enabled the camera, and selected an actor that's a skeletal mesh actor, you can change its skeletal mesh (if there are any) and animation. Be aware that game code might crash if it is confronted with two playable characters all of a sudden (e.g. you cloned your character), or that the game crashes because you play an animation that's not expected. So use this feature with care (e.g. be sure to save to avoid losing a lot of progress).
Once you've started an animation on a skeletal mesh actor, you can pause it by clicking the 'Stop animation' button. This allows you to, e.g. set the exact position within the animation to find that frame for the best screenshot.
Scaling/moving/rotating the actor
You can move and scale an actor (if it's moveable) and if the gamelogic allows it, also rotate the actor. With this, combined with cloning actors and pausing their animations at different frames, you can create custom scenes. The movement directions are relative to the camera look direction. So if you want to move something in a certain direction, you have to take in to account the direction the camera is facing.
Resetting an actor's state
When you disable the camera, the actors you've changed will be reset to their original state. You can also do that per actor by clicking the 'Reset actor state' button. This will set the actor's state back to the original state it had before you selected it, and will remove the actor from the selected actors list. If the current actor is a clone, there's a 'Delete clone' button instead.
If you don't want to have the actor state to be reset when you disable the camera, please uncheck the setting 'Reset actors when camera on camera disable'. This will make sure the changes you made will be kept when you disable the camera and will be present during gameplay.
The pose editor (Skeletal mesh actors)
The pose editor is available for Skeletal mesh actors, if the UUU has found the necessary information. To open the pose editor, please click the Show pose editor button. If the button isn't available, even tho you have selected a Skeletal mesh actor, then the UUU wasn't able to obtain the right information and the pose editor won't be available to you.
After you've clicked the Show pose editor button, you'll see a new editor with two panels glued together, the Pose editor window itself and a separate panel 'Bone Controls panel'. If you want this Bone Controls panel to be docked at the bottom of the Pose editor window or as a free floating window, you can do so by selecting the right Dock type in the Bone Controls panel. To make the panels bigger or smaller, please use the resize triangles in the lower right corner of the panels.
The Pose editor panel contains three tabs, where one is only shown when you edit a bone: 1) a tree with 'bones', which form the skeleton of the current mesh of the skeletal mesh actor (e.g. your character), 2) a list of morph targets per component in the actor. This tab might be empty if the game doesn't support morph targets on its actors, and 3) a tab which contains the bones you've recently edited. This is a convenience tab so you don't have to scroll the tree a lot when you want to go back to a bone.
The Bone Tree
The bone tree lists for each component in the actor that has a skeleton a tree of bones. This tree is hierarchical, meaning the bones attached to a given bone (e.g. lower arm to an upper arm) are displayed below it. This hierarchy is important because rotating the 'parent' bone will also rotate / move the 'child' bones attached to it. In the case of when an actor has multiple components, you might notice the same tree in several components, because the same skeleton is used for these components. The UUU will keep these bones in sync, so you don't need to change the same bone in each of the components.
When you enable pose editing, and hover over a bone, the location of that bone is shown on your character using a blue dot. This will make it easier to select the right bone for the edit you want to make.
Bone editor gizmo
Like with having a gizmo on the selected actor, you can also view and use a 3D gizmo on the selected bone. To do this, check the Show editor gizmo on selected bone checkbox at the top of the pose editor. It offers the same functionality as the gizmo on the actor, however rotating the bone using the gizmo will rotate the axis system as well, so you always see the right orientation of where x/y/z are. This can help with positioning the bone using the sliders. Of course you can also use the 3D gizmo to do that.
As with the actor gizmo, press Ctrl-Shift-T (or the key you bound to it) to toggle more or less transparency for the gizmo, in case you need to see through the gizmo
while editing.
Only one gizmo will be shown at any given time. So if you have the pose editor open and have enabled posing, the actor gizmo will be hidden. When you stop with the posing editor, the actor gizmo will be shown again.
The Morph targets list
The Morph Targets list shows all morph targets per component (if the game supports them). Morph targets are essentially a directive to the engine to move parts of the mesh of the component to a certain point, e.g. move an eyelid, or move a jaw, or cheek. These are often very useful, as they can move parts that otherwise would require multiple bones to be adjusted. The downside is that all you can specify is the amount of how much the morph target is in effect: 0 being not in effect (the default) and 1.0 mean fully in effect (or -1.0 to be fully negative, basically moving the part in the other direction).
Morph targets sometimes don't do much, and are more used to correct changes made by bone adjustments; bones and morph targets both in the end change parts of the mesh of the component and can thus have the same effect (or one correcting the other).
This means that what you want to do is sometimes a matter of changing a couple of bones or change a couple of morph targets or both. Saving a pose will save both so together they form the pose you work on.
Getting started with posing
Posing doesn't work if you have paused the game using the Numpad 0 pause (UWorld::IsPaused pause). If you want to pause the game, pause it with the PageDown
pause (Slomo pause). When the game is paused with Numpad 0, no bone logic is processed by the engine so your changes have no effect.
Posing a character starts by checking the Enable pose editing checkbox. When doing that, the animation of the character will pause and you can now change the position, orientation and scale of any bone in the skeleton, except the Root bone, as well as change morph targets, if available. If the character you selected has e.g. a spine bone, click that bone in the tree, and you'll see you can change values in the Bone Controls panel. Click and drag any of the values to change them and you should see the bone change. It can be the bone has no direct effect on your character but usually you'll see a difference. E.g. a spine bone, if you change one of the angles you'll see the character's torso will rotate in a given direction.
To quickly rotate/move/scale, hold Shift + dragging. To specify an exact value, Ctrl click on a value and to precisely drag a value, hold Alt while dragging the value. The sliders are more precise than the 3D gizmo, however the 3D gizmo offers some quick editing capabilities that might take longer with the sliders, so try both out to see what helps you the most when setting up your pose!
If the game supports Morph Targets, you can try these too, using the value next to the morph target you want to change on the Morph Targets tab. Sometimes morph targets don't have a lot of effect, however morph targets for e.g. face components can be quite expressive, so don't forget to try them out.
Saving/loading a pose
You might want to re-use a pose for a character at a later time. To do this, you can save a pose by clicking Save pose... at the top. To load a pose you've saved previously, please click Load pose.... If you only want to e.g. load the scale or orientation of the bones in the pose, you can specify that with the Load options... button.
Keep in mind that bone data is stored per bone name. While it's common that different characters in a game share a great deal of bones, it's unlikely you can load a pose from game A into game B: the loading will succeed but your character likely will be totally messed up or it won't do anything at all.
If you have questions, they might have been answered in the FAQ section of this documenation site.
Importing a sub tree
You can import parts of a bone tree from a pose file. This can greatly speed up posing, e.g. when you have a pose with a given facial expression and you want to re-use that facial expression on the current pose of your character. To do this, first select the bone in the bone tree which you want to import. The bone you selected is the top of the tree you'll import, so all bones attached below that bone are also imported. After you've selected the right bone, click on the button 'Import subtree...'.
This will open the load pose window. By selecting a pose file, the UUU will lose the bone data of the sub tree you've selected from the pose file. Of course the pose in the pose file has to be compatible with the character you're importing the pose for.
The pause tab
The pause tab offers the basic pause features, like pausing the game using the two different pause systems, as well as pausing NPCs. It additionally allows you to specify the gamespeed and/or NPC speed: first check the checkbox in front of the value, after which you can alter the value.
The lights tab
The lights tab offers the ability to create in-game lights, both spotlights and pointlights. The functionality is roughly the same as the client-side Lights feature that's described earlier in this document. The light editors of the in-game overlay offer a couple more features than the client's light editor. For details about what all the settings mean, please see the Lights section above.
The light settings are kept in sync with the client, so it doesn't matter which editor you're using. The light editors in the overlay offer a handfull more options than the client's light editor and are in general a bit smoother. If you want to have the full editing experience, it's best to use the overlay's light editors.
At the moment the buttons to move and attach the camera to the light or move the light to the camera and attach it to the camera use abbreviations (e.g C -> L means Move the camera to the light's location and attach the light to the camera), tho each button has a tooltip which explains what each button does.
Light visualizers
Light visualizers are available in games using UE 4.24 or later. Earlier versions of the engine lack important functions used to calculate required data for the visualizer to be properly rendered.
Light Visualizers are in-game objects to show you where your lights are and in what direction they're pointing. For spotlights an arrow and a cone, the size of the spotlight cone is placed at the location of the light and it points in the same direction as the spotlight. For pointlights a 6-arrow object is placed at the location of the pointlight. Additionally, the visualizers offer a way to select the light by clicking on the circle that's rendered at the spot where the light is.
The visualizers are shown when the in-game overlay is shown, the lights tab is the active tab and visualizers are enabled. Selecting another tab in the in-game overlay or disabling the overlay entirely will hide the visualizers as well. The light's effective color (light color + temperature setting) will also be used for the visualizer's color. Disabling a light will dim the visualizer and make it semi-transparent.
When the light is selected in the 3D world, it will become the active light and the gizmo (if enabled) will be placed on that light. This helps with moving and rotating the lights in your scene without the necessity to attach the lights to the camera for movement.
To toggle the visualizers on / off you can use the button on the Lights tab in the client or the checkbox on the Lights tab. Additionally you can use the assigned key (be sure to enable keyboard throughput to the tools using the overlay's topleft menu). By default the keyboard shortcut is ;, but you can change this in the Keybindings tab. Especially users using a non-US keyboard would likely want to bind a different key for this.
Light gizmo's
The gizmo's work the same as with the actor manipulation tab: they offer a 3D axis system to move the light in the 3D world and for the spotlight they also offer a way to rotate the light over the 3 axis. Pointlights don't have these rotation options as the rotations are over the world axis and not the local rotations. For rotating the light in-place, please use the rotation values in the light editor itself.
Editor gizmo's are available in games using UE 4.24 or later. Earlier versions of the engine lack important functions used to calculate required data for the gizmo to be properly rendered.
The overlay settings
When you open the overlay, at the top of the screen you'll find a menu bar with some status messages if you e.g. have enabled the camera or paused the game. The settings menu for the overlay is on the top left, where you'll find a couple of settings to make your life easier when working with the overlay. The settings are straightforward and stored per game.
Games that work with the UUU
Although the name suggests it's a universal unlocker that always works with any Unreal Engine 4 game, the reality is that developers sometimes change the game engine's code and the unlocker can't re-activate the console as essential functions aren't there anymore, or activate other features offered by the UUU. The list below are games which are known to work with the unlocker.
The Lights column mentions all games which have been verified that the custom lights work. It might very well be the lights work in many other games on this list. If you play one of these games and the lights work for these games but it's not marked as such on this list, please let me know.
If you're pausing with PageDown (slomo pause), and have motion blur enabled in the game's settings (or it's enabled by the game and you can't disable it in the game settings) you'll likely see motion blur streaks / blurry edges when moving the camera in games built with UE4.25 or higher. To disable this, please use
r.motionblurquality 0 on the console to disable motion blur. To enable it again specify a value higher than 0.
| Title | Lights | Notes |
|---|---|---|
| 9 Monkeys of Shaolin | Yes | |
| 10 Dead Doves | Yes | Hotsampling might crash the game at times |
| 10 Miles to Safety | ||
| 63 Days | Yes | |
| A Doctor's Term | Yes | |
| A Knight`s Quest | ||
| Ad Infinitum | Yes | |
| Adam - Lost Memories | ||
| Aefen Fall | ||
| Agony | ||
| Alan Sharp | ||
| Albatroz | Yes | |
| Alice VR | ||
| Aliens Dark Descent | Yes | HUD toggle doesn't hide all elements. |
| Alien: Fireteam Elite | Yes | Remap enable camera key as Insert opens the console. |
| Alone in the Dark | Yes | |
| Alone in the Dark Prologue | Yes | |
| Amid Evil | ||
| Amok Runner | Yes | |
| The Anacrusis | Yes | |
| Ancestors Legacy | ||
| Ancestors - The Humankind Odyssey | No | Adding a light will crash the game |
| Ancient Knowledge | ||
| Another Sight Definitive Edition | ||
| Anvil | Yes | |
| Apsulov: End of Gods | Yes | |
| Aquanox Deep Descent | ||
| As We Descend | Yes | |
| Arboria | ||
| Areia: Pathway to Dawn | ||
| Arid | ||
| Arise a Simple Story | No | |
| Armoured Onslaught | ||
| The Artful Escape | Yes | |
| The Ascent | Yes | Rebind Enable camera and UWorld Pause keys to different keys than Numpad 0 and Insert as the game opens the menu with these. |
| Ashes Of Oahu | ||
| Asterigos: Curse of the Stars | Yes | |
| Asterix & Obelix XXXL The Ram From Hibernia | Yes | |
| Astor: Blade of the Monolith | Yes | |
| Assemblance: Oversight | ||
| Assetto Corsa Competizione | ||
| Atomic Heart | Yes | v4.5.8 or higher. Delete lights after you've used them otherwise they'll stop the game from loading a level. HUD toggle doesn't hide subtitles, you need the shader toggler for that (Guide + ini file) |
| AWAY: The Survival Series | Yes | |
| Azur Lane Crosswave | ||
| Backbone | ||
| Bad Boys at School | ||
| Balan Wonderworld | No HUD toggle | |
| Bard's Tale IV: Barrows Deep | ||
| Barnfinders | Yes | |
| Bastide | ||
| The Battle of Visby | ||
| The Beast Inside | ||
| Bee Simulator | ||
| Beyond a Steel Sky | ||
| Big Earth | Yes | |
| BIOMUTANT | Yes | |
| The Blackout Club | ||
| Black Legend | ||
| Blade of Arena | ||
| Blair Witch | Yes | |
| Bleak Faith: Forsaken | Yes | |
| Blind Fate - Edo no Yami | Yes | |
| Blood of Mehran | Yes | Tested on demo. |
| Bloodhound | Yes | |
| Borderlands 3 | Yes | Lights don't have dynamic shadows |
| BPM: Bullets per minute | ||
| Bramble: The Mountain King | Yes | |
| The Bridge Curse | Yes | |
| The Bridge Curse 2 | Yes | |
| Bright Memory | Yes | Player character is on Lighting channel 1 |
| Bright Memory: Infinite | Yes | Player character is on Lighting channel 1 |
| Britannic: Patroness of the Mediterranean | ||
| Broken Pieces | ||
| Bum Simulator | Yes | |
| Burning Daylight | ||
| Call of Cthulhu | Yes | |
| Call of the Sea | ||
| The Callisto Protocol | Yes | v4.7.3+ gives all features. |
| Capes | No | Lights crash the game. HUD toggle doesn't toggle all HUD elements, use shader toggler for the ones that remain |
| Captain Starshot | ||
| CASCADER | Yes | Tested on demo |
| Castle Rock Beach, West Australia | ||
| The Chant | Yes | |
| Charon's Staircase | Yes | |
| Chasing the Unseen | Yes | |
| Chernobylite | Yes | |
| Chorus | Yes | PageDown could crash the game, use Numpad 0 for pause |
| Cions of Vega | ||
| Clash: Artifacts Of Chaos | Yes | |
| Close to the Sun | ||
| Code Vein | No | Creating a light will crash the game. Insert opens the console so rebind it to a different key. |
| Colony Ship | ||
| Comanche | ||
| Conarium | Yes | |
| Coral Island | Yes | |
| Corruption 2029 | ||
| Crash Bandicoot 4: It's About Time | ||
| Creature in the Well | ||
| Crime Boss | Yes | |
| Crisis core –FINAL FANTASY VII– Reunion | Yes | Console doesn't accept typing, no hotsampling. Black bars are removed with the HUD toggle. |
| The Crown of Wu | Yes | |
| Crown Wars: The Black Prince | Yes | Post processing sliders won't take effect immediately when pausing with Numpad 0. |
| CRYMACHINA | Yes | |
| Curse of Anabelle | Yes | |
| CYGNI: All Guns Blazing | Yes | |
| DaemonYesMachina | No | Lights crash the game, HUD doesn't hide in full, mech arms move with the camera. |
| Daydream: Prologue | Yes | |
| Dark Future: Blood Red States | ||
| Dark Deception | ||
| Dark Occult | ||
| Dark Space Ex Machina | ||
| Darknot | Yes | |
| Darksiders 3 | Yes | Player character is on lighting channel 1 |
| Darksiders Genesis | ||
| Daydream: Forgotten Sorrow | Yes | |
| Daymare: 1998 | Yes | Player character is on light chanel 1 |
| Days Gone | Yes | Pose editor won't work. |
| Dead Island 2 | Yes | Lights work but outdoors they are barely visible. |
| Deadcraft | Yes | Tested on demo |
| DeadPoly | Yes | |
| Deathbound | Yes | Characters have their light channel set to 1, so switch the light's light channel to 1 to have them affect characters. |
| Deep Rock Galactic | Console not available | |
| Deliver us the moon | ||
| Deliver Us Mars | Yes | |
| The Devil In Me | Yes | Use Numpad 0 to pause. |
| Demon Skin | ||
| Demon Slayer -Kimetsu no Yaiba- The Hinokami Chronicles | Yes | |
| Destroy all humans | Yes | |
| Destroy All Humans! 2 - Reprobed | No | |
| Desolate | ||
| Devil's Hunt | Yes | |
| Devolverland Expo | ||
| Die by the blade | Yes | |
| Die young | ||
| Disaster Report 4: Summer Memories | Also works with the demo | |
| Disintegration | ||
| DNF Duel | No | No console / lights. HUD toggle works partly |
| Do you copy? | ||
| Do not open | Yes | |
| Donensbourgh | ||
| DRAGON BALL Z: KAKAROT | HUD toggle doesn't hide some parts of the HUD. | |
| Dragon Quest XI: Echoes of an Elusive Age | No, spawning a light will crash the game | Use UUU v4.9.3+. HUD toggle doesn't hide all elements. Use shader toggler to fix that. |
| Drake Hollow | ||
| Draugen | Yes | |
| DreadOut 2 | ||
| Dreamo | ||
| Dreamscaper | Also works in Dreamscaper Prologue | |
| DreamWorks All-Star Kart Racing | Yes | |
| Driftland | ||
| Drug Dealer Simulator | ||
| Dungeon Defenders: Awakened | ||
| Dwarrows | ||
| Earth Defence Force: Iron Rain | ||
| Earthfall | ||
| Echo | Yes | |
| Ed-0: Zombie Uprising | Yes | |
| Edge of the abyss Awakening | Yes | |
| Effie | ||
| Edengate: The Edge of Life | Yes | |
| Eldrimar | Yes | |
| Elea | ||
| Elli | ||
| The Entropy Centre | Yes | |
| Esse Proxy | Yes | |
| Eresys | Yes | |
| Estranged Act II | ||
| The Eternal Cylinder | Yes | |
| Europa | Yes | Tested on demo |
| Everspace | ||
| Evil West | Yes | |
| EVOTINCTION | Yes | |
| Eximius: Seize the Frontline | ||
| The Expanse: A Telltale Series | Yes | Characters have their light channel set to channel 1, so to light a character you have to select that light channel as well in the light editor of your light. |
| Expedition Zero | Yes | |
| Explore Fushimi Inari | ||
| Extinction | ||
| F.I.S.T.: Forged In Shadow Torch | Yes | |
| Fade to silence | ||
| Fear the Dark Unknown | ||
| The Fidelio Incident | ||
| Fighting Ex Layer | ||
| Filament | ||
| Final Fantasy VII Rebirth | Yes | Needs v4.9.7+. Hotsampling works beyond 4K. Use Reshade 6.3.3 or later to avoid crashes when hotsampling. The cutscene DOF is disabled by the UUU when you enable the camera. For Ultrawide, use Lyall's mod. For the console input, use emoose's mod |
| Final Fantasy VII Remake Integrate | Yes | Needs v4.1.7+. See for more details the guide on the Framed site |
| Finding the Soul Orb | ||
| The First Bezerker: Khazan | Yes | Tested on demo. Deleting a light will crash the game sometimes. So better switch it off instead |
| Five Nights at Freddy's: Secret of the Mimic | Yes | |
| Five Nights at Freddy's: Security Breach | Yes | |
| Flintlock: The Siege of Dawn | Yes | |
| The Forgotten City | ||
| Freud Gate | ||
| Frozen Flame | Yes | |
| Frozenheim | ||
| Gal Gun 2 | ||
| Gamedec | ||
| Gangs of Sherwood | Yes | |
| Genesis Alpha One | ||
| Genesis Noir | ||
| Ghostrunner | Yes | |
| Ghostrunner 2 | Yes | |
| Giraffe and Annika | ||
| Godfall | No console. | |
| Gotham Knights | Yes | Requires 4.5 beta 2 or higher. No Numpad 0 pause (use PgDn) |
| Granblue Fantasy Versus: Rising | Yes | Console doesn't open |
| Grand Guilds | ||
| Graven | Yes | |
| Gray Dawn | ||
| Greyhill Incident | Yes | |
| GRIP: Combat Racing | ||
| Grounded | Tested on demo | |
| Gu Lady 蛊婆 | ||
| Guilty Gear Strive | Pause the game before moving the camera, otherwise the characters move too. | |
| GUNDAM BREAKER 4 | Yes | |
| Gungrave G.O.R.E | Yes | |
| Gylt | Yes | |
| The Gunk | Yes | |
| Halflight | ||
| Hannah’s Day | Yes | Tested on demo |
| Harvestella | Yes | Although lights work, creating them might sometimes crash the game. |
| Hazel Sky | Tested on demo | |
| Hellblade: Senua's Sacrifice | Yes | |
| Hellbound | ||
| Hellbreach: Vegas | Yes | |
| Hello Guest | Tested on Alpha build. | |
| Hello Neighbor 2 | Yes | |
| Hell Pie | Yes | |
| Hi-Fi RUSH | No | HUD toggle doesn't work 100%, Numpad 0 pause doesn't pause the game (use PgDn). |
| High on Life | Yes | HUD toggle doesn't work. FoV control has to be done through the console, or type Fov once on the console to reset it to the default to be able to control the FOV through the camera controls. |
| Hogwarts Legacy | Yes | Custom lights might look like they're not created, increase the range or intensity. |
| Hollow | ||
| Hollow 2 | Yes | |
| Homeworld 3 | Yes | Hud toggle doesn't toggle all elements. Tested on demo. |
| Horror Tales: The Wine | Yes | |
| Hot Wheels Unleashed | Yes | |
| House of Ashes | Yes | Supported since v4.1.1 |
| Human or Virus | ||
| Hunter's Arena: Legends | ||
| Hunting Simulator | ||
| Hunting Simulator 2 | ||
| Hyper Light Breaker | Yes | |
| Hypercharge Unboxed | ||
| Hot Wheels Unleashed 2 - Turbocharged | Yes | Camera doesn't move when pausing with Numpad 0, use PgDn pause. Hud toggle doesn't hide all elements. |
| I Know This Place.. ? | Yes | |
| Idolm@ster: Starlit | Yes | |
| Icarus First Cohort | Yes | |
| Ikai | Yes | |
| Incantation | Yes | |
| INDIKA | Yes | |
| Industria | Yes | |
| Industries of Titan | ||
| Infliction | ||
| Inner Ashes | Yes | |
| Insomnia the Ark | ||
| Insurgency Sandstorm | ||
| Intruders: Hide and Seek" | ||
| The Invincible | Yes | To remove the black bars you need v4.6.11 or higher, enabling the camera will then remove the black bars. Screen doesn't update when you alt-tab, no matter which 'Block focus loss' method you select; clicking into the screen will activate the changes. Hiding the menu can be done by hiding the HUD. |
| Iron Survival | ||
| Japanese Drift Master | Yes | Tested on demo |
| Journey to the Savage Planet | ||
| Jumanji The Video Game | ||
| Jump Force (limited) | ||
| KAKU: Ancient Seal | Yes | |
| Kari | ||
| Keep Out | ||
| Kena: Bridge of Spirits | Yes | |
| Killsquad | ||
| Kine | ||
| King of Fighters XV | Yes | Characters might stretch when moving the camera. |
| Koral | ||
| The Lacerator | Yes | |
| Laser League | ||
| The Last Oricru | No | |
| The Last Show of Mr. Chardish | ||
| Layers of Fear 2 | ||
| Laysara: Summit Kingdom | Yes | |
| Lempo | Yes | |
| Liberty Prime | ||
| Lies of P | Yes | Tested on demo. Hotsampling might require clicking Set twice |
| Life is Strange: True Colors | Yes | |
| Life is Strange remastered | No | Console only, no camera. Use toggledebugcamera for camera |
| Life is Strange 2 | ||
| LIGHT:Black Cat & Amnesia Girl | Yes | |
| Light Tracer 2 | ||
| Like A Dragon : Ishin | Yes | Requires UUU v4.6.10 or higher. |
| The Line | The K148 Game Studio game 'The Line' | |
| Ling: a Road Alone | ||
| Little Brother Jim | ||
| Little Hope | Yes | |
| Little Nightmares 2 | No | Console only, no camera. Use toggledebugcamera for camera |
| Little Nightmares 2 Enhanced Edition | Yes | Use Numpad 0 pause and then enable the camera. |
| Little Nightmares 3 | Yes | Tested on demo. Camera won't move if PgDn pause is used, only when Numpad 0 pause is used. |
| The Lord of the Rings Return to Moria | Yes | |
| Lost Ember | ||
| Lost Soul Aside | Yes | Use UUU v4.11.3 or higher. Steam version only. |
| Loopmancer | Yes | |
| Luna Abyss | Yes | Tested on demo |
| The Luna Abyss | Yes | |
| Lunacy - Saint Rhodes | Yes | |
| Mahoe Arms | ||
| Mail Time | Yes | |
| Man of Medan (The Dark Pictures Anthology) | Pose editor won't work. | |
| Mandragora: Whispers of the Witch Tree | Yes | Console might not open |
| Maneater | Yes | |
| Manor Lords | Yes | Pause options can be buggy. Game has its own pause tho, so it's not problematic |
| Marie's Room | Built-in camera doesn't work. Use toggledebugcamera for camera |
|
| Mark of the Deep | Yes | |
| Martha Is Dead | Yes | |
| Marvel vs. Capcom: Infinite | ||
| Metamorphosis | ||
| Medieval Dynasty | No hud toggle | |
| The Medium | Yes | Camera doesn't work in split-screen scenes |
| Miasma Chronicles | No | Lights crash the game |
| Mind: Path to Thalamus | ||
| Minecraft Dungeons | Yes | |
| Monkey King: Hero Is Back | ||
| Monster Energy Supercross: The Official Videogame 3 | ||
| Monster Jam Steel Titans | ||
| Moon Mystery | Yes | |
| Moons of Madness | Yes | |
| Morbid: The Lords of Ire | Yes | |
| Morels: The Hunt | ||
| Morphies Law Remorphed | ||
| Mortal Kombat 1 | Yes | Requires UUU v4.6.10 or higher. Console might not open with default keys. HUD toggle doesn't work. |
| Mortal Shell | Yes | |
| Moss: The Forgotten Relic | Yes | Tested on demo |
| MotoGP 19 | ||
| MotoGP 20 | ||
| MotoGP 21 | Yes | |
| My Hero One's Justice | ||
| My Hero One's Justice 2 | ||
| Mýrdalssandur, Iceland | ||
| Mysteria Occult Shadows | ||
| Narcos: Rise of the Cartels | ||
| Natsu-Mon: 20th Century Summer Kid | Yes | |
| NBA 2K Playgrounds 2 | ||
| Necromunda Underhive Wars | No hud toggle | |
| Nemesis Distress | Yes | |
| Nemesis Lockdown | Yes | |
| Nemezis - Mysterious Journey III | ||
| Nephise: Ascension | ||
| New Tales from the Borderlands | Yes | |
| Nigate Tale | ||
| Nightmare Kart | No | |
| NITRO GEN OMEGA | Yes | Tested on demo |
| No Straight Roads | ||
| Noch | Yes | |
| Observer | Built-in camera isn't available. | |
| Observer System Redux | Tested on demo. | |
| Occupation | ||
| Octopath Traveler | ||
| Octopath Traveler II | Yes | |
| Offroad Racing BuggyYesATVYesMoto | ||
| Omen of Sorrow | ||
| Omensight | ||
| Omno | Yes | |
| Only After | ||
| Open Country | ||
| Operencia: The Stolen Sun | ||
| Orcs Must Die 3 | ||
| Outcast: a new beginning | Yes | Tested on demo |
| The Otterman Empire | ||
| Out of Action | Yes | |
| The Outer Worlds | Yes | HUD toggle doesn't hide the entire HUD. Use showhud 0 |
| The Outer Worlds: Spacer's Choice Edition | Yes | HUD toggle doesn't hide the entire HUD. Use showhud 0 |
| The Outlast Trials | Yes | Requires v4.5 Beta 3 or higher |
| Overkill's The Walking Dead | ||
| Override: Mech City Brawl | ||
| Pacer | ||
| Pacific Drive | Yes | Physics freak out when using Slomo pause. Tested on demo. |
| Pagui打鬼 | ||
| Painkiller | Yes | Tested on demo |
| Paper Dolls 2 | Yes | |
| Paper Dolls Original | ||
| Paradise Killer | ||
| Paradise Lost | ||
| Paranormal Activity The Lost Soul | ||
| 港詭實錄ParanormalHK | ||
| Partisans 1941 | ||
| Past Cure | ||
| Pathless | No timestop/pause. Use ESC + hud toggle. | |
| People of Note | Tested on demo | |
| Perish | Yes | |
| Persona 3 Reload | Yes | HUD toggle doesn't hide all elements. You might want to use Shader Toggler to create a HUD toggle for the rest of the elements. |
| Phantom Fury | Yes | |
| Pieces of Me | Yes | |
| Planet Alpha | ||
| The Plucky Squire | Yes | |
| The Pit: Infinity | ||
| Pioner | Yes | |
| Pluviophile | ||
| Praetorians HD Remaster | ||
| Presences: Dark Awakening | Yes | |
| Project Remedium | ||
| Project Wingman | ||
| Protocol | ||
| Psychonauts 2 | Yes | Also with Gamepass / MS Store version |
| Pure Rock Crawling | Yes | |
| Quantum Replica | ||
| The Quarry | Yes | Needs UUU v4.3.1+. To proper pause the game, first use PageDown pause, this will still slightly move the game forward. Then press Numpad 0 to pause the game properly, then press PageDown again to unpause that. This should give a TAA Jitter/blur free image (mostly). Using just Numpad 0 for pause works, but you'll get a lot of TAA jitter/blur. Using PageDown only works too, but as the game isn't 100% paused it'll be difficult to take a still frame. For proper black bar removal, use Rose's black bar remover |
| Qube 2 | ||
| Queen's Domain | Tested on demo | |
| The Quiet Man | ||
| Radiolight | Yes | Tested on demo |
| Race With Ryan | ||
| RAD | ||
| Raji: An Ancient Epic Prologue | ||
| Ready or Not | Yes | |
| [Redacted] | Yes | |
| Redeemer | ||
| Redemption Reapers | Yes | |
| Redout | ||
| Redout 2 | Yes | PgDn (slomo 0 pause) crashes the game. Use Numpad 0 instead |
| Redout: Space Assault | ||
| The Redress of Mira | Yes | |
| Relicta | Yes | |
| Remnant: From the Ashes | ||
| Remothered: Broken Porcelain | ||
| Remothered: Tormented Fathers | ||
| Retchid | Yes | |
| Return to Grace | Yes | |
| Ride 4 | ||
| RipOut | Yes | |
| RKGK / Rakugaki | Yes | |
| Robin Hood - Sherwood Builders | Yes | |
| Roboquest | ||
| Rock of Ages 3: Make and Break | ||
| Rogue Spirit | Yes | |
| Romancing SaGa 2: Revenge of the Seven | Yes | Tested on demo. Use borderless fullscreen to get black bars removed. |
| Ruin 2 | ||
| Ruiner | ||
| Sackboy: A Big Adventure | Yes | Requires v4.5 Beta 3 or higher |
| Samurai Jack Battle Through Time | No console/timestop. Use menu + hud toggle for pause. | |
| Samurai Showdown | No aspect ratio correction | |
| Satisfactory | ||
| Scarf | Yes | |
| Scarlet Nexus | No slomo (PgDn) pause | |
| Scarred | Yes | |
| Scars Above | Yes | |
| Scathe | Yes | |
| Scorn | Yes | |
| SCP: Secret Files | Yes | |
| SCUM | ||
| SEASON: A letter to the future | Yes | |
| Selfloss | Yes | Tested on demo |
| September 7th | Yes | |
| Session: Skateboarding Sim Game | ||
| Severed Steel | Yes | |
| Shadows of Larth | ||
| Shadow warrior 3 | No | No console |
| Shape of the World | ||
| Shenmue 3 | ||
| Sherlock Holmes Chapter One | Yes | Characters are on lighting channel 1 |
| Sherlock Holmes The Awakened | Yes | Bottom vignetting is removable by switching to another AO using console command r.AmbientOcclusion.Method 1 |
| ShockRods | ||
| Showgunners | Yes | |
| The Shore | Yes | |
| Silver Chains | ||
| The Sinking City | Newer versions of the UUU might crash the game (v4.6.12+) | |
| Sinner: Sacrifice for Redemption | ||
| Sifu | Yes | |
| Silver Chains | Yes | |
| Skye Tales | Yes | |
| Skylar and Plux | ||
| Skully | ||
| SlavicPunk: Oldtimer | Yes | |
| SLEEP AWAKE | Yes | |
| The Sojourn | ||
| SolSeraph | ||
| Someday You Will Return | ||
| Song of Horror | ||
| Sophont | ||
| Sorrowvirus A Faceless Short Story | ||
| Soul Valley | ||
| SOULCALIBUR VI | Yes | Pose editor won't work. |
| South of Midnight | Yes | Use UUU v4.9.14+. Attaching a light to the camera won't move the light till it's detached. HUD toggle doesn't toggle all elements. For Gamepass, use UUU v4.9.15+ |
| Space Hulk: Deadwing Enhanced Edition | ||
| Space Hulk Tactics | ||
| Spacebourne | ||
| Sponge Bob Bikini Bottom Rehydrated | ||
| Sponge Bob SquarePants The Cosmic Shake | Yes | |
| Sprawl | ||
| Spyro Reignited Trilogy | ||
| Star Wars Jedi: Fallen Order | Yes | |
| Star Wars Jedi: Survivor | Yes | Numpad 0 pause does pause cutscenes, but their timing will continue, so to pause cutscenes, use PgDn (slomo pause). HUD toggle might prevent hotsampling, to work around that, toggle the hud after hotsampling, and enable the hud again when going back to your play resolution. Alternatively, use the shader toggle ini to toggle the hud. |
| Stardrop | ||
| Star Trek Resurgence | Yes | |
| Steel rats | ||
| Stela | ||
| Stellar Blade | Yes | Tested on demo. Use UUU v4.10.3 or higher. Aspect ratios narrower than 1.2 will show black bars. Use the preprocessor settings to get rid of CA/Vignette/Lens dirt/DoF. In some situations, the HUD doesn't toggle everything off. |
| Stories: the Path of Destinies | ||
| Stray | Yes | |
| Stray souls | Yes | Tested on demo |
| Styx 2 | No camera, please use toggledebugcamera on the console to use the debug camera instead |
|
| Succubus | Yes | |
| Subdivision Infinity DX | ||
| Submerged | Yes | |
| Submerged Hidden Depths | Yes | |
| Subverse | ||
| The Suicide of Rachel Foster | ||
| Superior: Vengeance | Yes | |
| Supraland | ||
| Sword and Fairy 7 (仙劍奇俠傳) | Yes | |
| Sword Art Online: Fatal Bullet | ||
| System Shock Remake | Yes | When using UWorld::IsPaused (Numpad 0) pause, the camera won't move. Use PgDn pause instead |
| Tales of Arise | Yes | Requires a custom key for the console to be selected other than ~, see configuration tab in the UUU client. Built-in camera doesn't receive controller / mouse input, use the keyboard for camera movement/control. Make sure the 'Use engine default for slomo min. value' on the configuration tab is checked, the game might otherwise crash. Pose editor won't work. |
| Tales of Kenzera™: ZAU | Yes | Tested on demo |
| Tartarus | ||
| TASOMACHI Behind The Twilight | ||
| Taxi Life | Yes | |
| Tchia | Yes | |
| Tell Me Why | (Also with xbox gamepass version) | |
| Terminator Resistance | ||
| Testament: The Order of High Human | Yes | |
| Tetris Effect | ||
| Thalassa Edge of the Abyss | Yes | |
| Thunder Tier One | Yes | |
| Tintin Reporter - Cigars of the Pharaoh | Yes | |
| Tiny Tina's Wonderlands | Yes | Use UUU v4.1.9+. Lights don't cast shadows. |
| Torchlight 3 | ||
| Tower of Fate | ||
| Trail out | Yes | |
| Transient | Yes | |
| Travis Strikes Again: No More Heroes Complete Edition | ||
| Trek to Yomi | Yes | |
| Trepang 2 | Yes | |
| Trials of Mana | Also works with the demo | |
| Tribes of Midgard | ||
| Troublemaker 2: Beyond Dream | Yes | |
| Tropico 6 | ||
| Trover Saves the Universe | Yes | |
| Twin Mirror | ||
| Ultra Age | Yes | |
| Under the Waves | Yes | CA and film grain are removable with shader toggler, not with console commands or post processing settings. |
| Unknown 9: Awakening | Yes | Use UUU v4.11.3 or higher |
| Urban Trial Playground | ||
| Uventa | ||
| Valkyrie Elysium | Yes | |
| Vampire : The Masquerade -Swansong | Yes | |
| Vampyr | No | Creating a light crashes the game |
| Venineth | ||
| Visage | Yes | |
| Visions of Mana | Yes | |
| VLADiK BRUTAL | Yes | |
| Voidtrain | Yes | |
| Wanderstop | Yes | Tested on demo |
| Wanted: Dead | Yes | |
| War Mongrels | Yes | |
| Warhammer 40,000: Boltgun | Yes | |
| Wartile | ||
| Way of the Hunter | Yes | It can be after injecting the UUU that prices for game suddenly become 0. It's unclear why this is. |
| Wayfinder | Yes | Requires UUU v4.6.13 or higher |
| The Waylanders | Yes | |
| We Happy Few | Built-in camera isn't available. | |
| We Went Back | HUD toggle doesn't toggle crosshair. Use showhud 0 |
|
| Weakless | ||
| Weird West | Yes | |
| Werewolf The Apocalypse Earthblood | ||
| White Day 2: The Flower That Tells Lies | Yes | |
| Windfolk - Sky is Just the Beginning | Yes | |
| Witchfire | Yes | Fov can't be changed |
| Withstand: Survival | ||
| Wizardry: Proving Grounds of the Mad Overlord | Yes | |
| What Happened | ||
| The Works of Mercy | ||
| WWE Battlegrounds | ||
| XING The Land Beyond | ||
| Xuan-Yuan Sword VII | Yes | |
| ZED |
Additionally, most UE4 games on Itch.io are usable with the UUU.
Dumping object information
The UUU can dump the object store with the memory locations, names, types, structure and more of all currently active engine objects a text file in the game folder, called UUU_ObjectsDump.txt. To do that, on the Available features tab, click the Dump object info button. The memory addresses listed in the file differ per level and every time you run the game, so if you want to look up objects in-memory after you've loaded a new level, you have to dump the file again.
Dumping cvars
The UUU can dump cvars (console variables) and console commands with their name, current value, their type and help text to a text file. This text file will be placed in the game folder, called UUU_CVarsDump.txt. Additionally, they're also written to a .json file in Json format, in the same folder, with the filename UUU_CVarsDump.json. To dump the cvars, on the Available features tab, click the Dump CVars button. This dump will not only include all default UE4 cvars and console commands but also custom ones added by the game developer.
After you've dumped the cvars to a file, open it in notepad or other text editor. For a particular cvar, the dumped information in the text file looks like this:
foliage.LODDistanceScale | Float | 1.000000 | 0x0 (SetByConstructor)
        Scale factor for the distance used in computing LOD for foliage.
This tells you: the variable foliage.LODDistanceScale is a floating point variable, has currently the value 1.0, has no special flags, and
has as help text Scale factor for the distance used in computing LOD for foliage. See for more information how to read and change console variables
Opening the in-game console.
When you dump the cvars, the UUU will reset flags that prohibit you from executing certain commands and setting certain cvars which set to readonly or are cheats. This doesn't mean they'll work or have any effect (as that depends on the final engine code being included in the game), but at least you can change their value and execute these commands.
Not all information is available in every game: help texts and flags are included when the game uses UE4.19 or newer. The current value and type are included when the game uses UE4.24 or newer.
Information recorded with camera path nodes
When you create a Camera path, each node records the camera location, orientation and field of view. Additionally, the post processing settings: Auto exposure bias, Depth of field focal distance, Depth of field f-stop and Vignette intensity are recorded as well.
Saving/restoring camera state
After you've enabled the camera (default with Insert), you can store the current camera state in three slots. The camera state is the current location,
the orientation/rotation of the camera and the FoV, as well as other information recorded in camera path nodes, as the system uses camera path nodes under the hood.
By default you save the camera state by using
Ctrl + F1 for saving the current camera state in slot 1, Ctrl + F2 for saving the current camera state in slot 2 and
Ctrl + F3 for saving the current camera state in slot 3. To restore the camera state to a saved state, press F1 to restore the camera to the state saved
in slot 1, press F2 to restore the camera to the state saved in slot 2 and, press F3 to restore the camera to the state saved
in slot 3. These keys are configurable in the keybindings tab.
When you disable the camera again, the saved states are lost. If you want to preserve game states after you disabled the camera (e.g. you want to move the character a bit, and then enable the camera again), use a camera path and add the camera states you want to save as nodes. Camera paths are preserved after you disable the camera.
Controls
The default photomode mod controls are listed below. It depends on the Camera control device setting on the Configuration tab whether the device (e.g. mouse or gamepad) can control the camera.
Mouse
When moving the mouse:
- No mouse buttons pressed: rotate the camera
- Left button pressed: move camera up / down / left / right
- Right button pressed: move camera forward / backward / left / right
- Both left and right button pressed: tilt camera left / right
- Mousewheel: increase / decrease Field of View (FoV)
When you are holding Ctrl, rotation/movement is slower. When you are holding Alt, rotation/movement is faster.
When moving the mouse and holding Shift:
- No mouse buttons pressed: player pawn rotation left / right
- Left button pressed: move player pawn up / down / left / right
- Right button pressed: move player pawn forward / backward / left / right
Keyboard
Normal camera usage
| Key | Feature |
|---|---|
Insert |
Enable / Disable the camera |
Numpad . |
Block / Unblock input to game |
Numpad - |
Decrease FoV |
Numpad + |
Increase FoV |
Numpad * |
Reset FoV |
Home |
Lock / Unlock camera movement |
Numpad 4 |
Move camera left (+ Ctrl: slower, + Alt: faster) |
Numpad 6 |
Move camera right (+ Ctrl: slower, + Alt: faster) |
Numpad 8 |
Move camera forward (+ Ctrl: slower, + Alt: faster) |
Numpad 5 |
Move camera backward (+ Ctrl: slower, + Alt: faster) |
Numpad 7 |
Move camera up (+ Ctrl: slower, + Alt: faster) |
Numpad 9 |
Move camera down (+ Ctrl: slower, + Alt: faster) |
Numpad 4 |
Move camera left (+ Ctrl: slower, + Alt: faster) |
Arrow key Up |
Rotate camera up (+ Ctrl: slower, + Alt: faster) |
Arrow key Down |
Rotate camera down (+ Ctrl: slower, + Alt: faster) |
Arrow key Left |
Rotate camera left (+ Ctrl: slower, + Alt: faster) |
Arrow key Right |
Rotate camera right (+ Ctrl: slower, + Alt: faster) |
Numpad 0 |
Pause / Unpause the game (Using UWorld::IsPaused) |
Page Down |
Pause / Unpause the game (Using slomo 0) |
Page Up |
Skip a few frames when paused |
Numpad 1 |
Tilt camera left (+ Ctrl: slower, + Alt: tilt 90 degrees left) |
Numpad 3 |
Tilt camera right (+ Ctrl: slower, + Alt: tilt 90 degrees right) |
Numpad 2 |
Reset tilt |
Delete |
Toggle HUD |
F1 |
Restore the camera state to the state saved in slot 1 (+ Ctrl: store current state in slot 1) |
F2 |
Restore the camera state to the state saved in slot 2 (+ Ctrl: store current state in slot 2) |
F3 |
Restore the camera state to the state saved in slot 3 (+ Ctrl: store current state in slot 3) |
Camera path usage
| Key | Feature |
|---|---|
F7 |
Start / pause playback |
F8 |
Stop playback |
F4 |
Add path |
Ctrl-F4 |
Delete active path |
F10 |
Add node to active path |
Ctrl+F10 |
Replace the active node on the active path |
Alt+F10 |
Insert a new node in front of the active node on the active path |
Shift-F10 |
Insert a new node after the active node on the active path |
Ctrl-F9 |
Delete active node on the active path |
Ctrl+Home |
Go to start of active path |
Ctrl+End |
Go to end of active path |
Ctrl+Page Up |
Go to previous node on active path |
Ctrl+Page Down |
Go to next node on active path |
Numpad 1 |
Select the first path during playback (if any) |
Numpad 2 |
Select the second path during playback (if any) |
Numpad 3 |
Select the third path during playback (if any) |
Numpad 4 |
Select the forth path during playback (if any) |
Numpad 5 |
Select the firth path during playback (if any) |
Numpad 6 |
Select the sixth path during playback (if any) |
Numpad 7 |
Select the seventh path during playback (if any) |
Numpad 8 |
Select the eighth path during playback (if any) |
Numpad 9 |
Select the ninth path during playback (if any) |
Lights usage
| Key | Feature |
|---|---|
Ctrl-Shift-S |
Create a new spotlight at the location of the camera |
Ctrl-Shift-P |
Create a new pointlight at the location of the camera |
Ctrl-Shift-A |
Move the camera to the active light and attach the light. This will always preserve the camera's location |
Ctrl-Shift-L |
Move the active light to the camera and attach it. This will always preserve the camera's location |
Ctrl-Shift-D |
Detach the active light from the camera. The camera will move to its preserved location when the light was attached |
Ctrl-Shift-C |
Create a copy of the active light at the camera's location |
; |
Toggle light visualizers |
Miscellaneous usage
| Key | Feature |
|---|---|
Alt-\ |
Toggle gamespeed override |
Alt-[ |
Decrease gamespeed. |
Alt-] |
Increase gamespeed. |
Ctrl-/ |
Toggle NPC speed override |
, |
Decrease NPC speed |
. |
Increase NPC speed |
End |
Toggle NPC pause |
As some of these are keys that are placed on different spots on keyboards for different languages, you might want to rebind these keys for your particular keyboard if they don't function properly.
Gamepad
Normal camera usage
| Control | Feature |
|---|---|
| Left stick | Move camera forward / backward / left / right |
| Right stick | Rotate camera |
| Left trigger | Move camera up |
| Right trigger | Move camera down |
| Y button + left / right stick | Faster movement / rotation |
| X button + left / right stick | Slower movement / rotation |
| D-pad up / down | Decrease (zoom in) / Increase (zoom out) FoV |
| B button | Reset FoV |
Camera path usage
| Control | Feature |
|---|---|
| Start | Start / pause playback |
| Back | Stop playback |
| Left bumber | Go to previous node on active path |
| Right bumper | Go to next node on active path |
| A | Add node to active path |
Miscellaneous usage
| Control | Feature |
|---|---|
| X button + pressing left stick | Toggle gamespeed override |
| X button + left bumper | Decrease gamespeed. |
| X button + right bumper | Increase gamespeed. |
| A button + left stick | Move player pawn left / right / forward / backwards |
| A button + right stick | Rotate player pawn left / right |
| A button + left trigger | Move player pawn up |
| A button + right trigger | Move player pawn down |
Credits
Development: Otis_Inf
Research: Otis_Inf and SunBeam
Logo: Ichisake
Special thanks to Pino44io for testing.