Camera paths
Introduction
Camera paths are ways to define a path over which the camera will move smoothly in the amount of time you specified. Camera paths consists of two or more path nodes which you can create by moving the camera somewhere and pressing a button or key. The tools will then record the current state of the camera, e.g. where it is located and what direction it's facing, as well as a select number of setting values, like fog or time of day (if the game supports these). The system will then calculate a smooth path through all the nodes for you.
After defining a path, you can play the path back and e.g. record it as a video. An example of a 4 node path played with a duration of 20 seconds is shown below.
The camera paths feature is available when you enable the camera. If you disable the camera, a playback in progress will be stopped and all camera paths functionality will be unavailable. When you disable the camera, all paths are preserved. When you re-enable the camera, you can continue where you left off.
It might be the camera path window in the photomode mod you're using might look slightly different than the screenshots below show. The screenshots below are showing the camera path window in the latest version of the system. If the photomode mod you're using doesn't have these features, it's built with an older version of the system and perhaps will be updated with the newer features in the future.
Most of the features discussed below are also bound to keyboard shortcuts and gamepad buttons. Using the keyboard / gamepad might be beneficial in some cases. It's entirely up to you what you want to use: the Camera Path Control window or the bindings, or both.
What's recorded with a camera path node
A path consists of two or more camera path nodes, which you can create using easy tools, as described further in this section. The path itself is calculated during playback so the camera moves smoothly between these nodes (using a 'catmull rom spline' for the people who want to know what's driving that smoothness). Not only the camera is transitioned from the state of the previous node to the state of the next node, also the field of view and additional setting values are smoothly transitioned from one node to the other.
It depends on the game which settings are recorded. It's described on the game specific page which information is recorded per node. For example for Assassin's Creed Valhalla, the fog settings and the time of day value are all recorded per node. So if you have two nodes in a path, and you set the time of day on the start node at 10.00am and the time of day on the end node at 20.00am, during playback over the path, the system will interpolate smoothly between those two times, creating a transition between these two times in the game world.
This can lead to interesting aspects in a video, so do experiment!
The Camera Path Control Window
To help you with defining a path and its nodes, the IGCS Client offers a separate window, the Camera Path Control Window. This window can be opened by clicking the Show camera path control window toggle at the bottom of the IGCS Client window. The Camera Path Control Window will pop up as a 'top most' window (so it's always on top of any other window), and is by default placed at the top left corner of the game window. You can move it freely to another spot and next time it'll open at that location.
The window looks like the one below. It has four main parts, as marked with numbers 1 to 5:
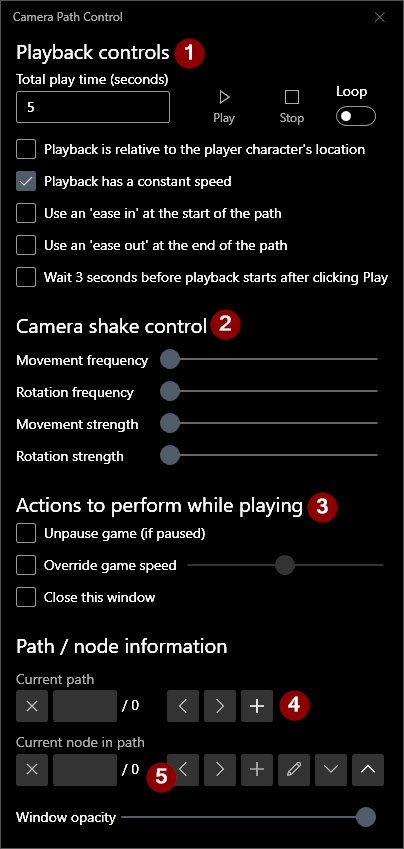
- The playback controls
- The camera shake factors
- The actions to perform while playing
- The path controls
- The node controls
The playback controls
The playback controls allow you to play a path. The amount of time playback takes is defined using the Total play time (seconds) textbox. In the example above the default of 5 seconds is shown. The more seconds you specify, the slower the speed of the camera when it moves over the path. You have to specify a value larger than 0 to make playback start.
When a valid path is selected, you can click Play to start playback, and Stop to stop playback. When Play is clicked, the button will change into a Pause button to pause playback. To loop playback, click the Loop toggle. Looping playback will make sure a complete loop from the start node to the end node and back to the start node takes the specified number of seconds and will then start again, till you click Stop.
During playback or when the playback is paused, the camera feature is unavailable, till you click Stop.
If you change an option of the playback controls, except the three second delay option, it's also available for when you control playback through the keyboard or controller. The three second delay option is only available through the Gui.
Playback tied to the player's location (optional)
If the particular photomode mod supports this feature, then below the playback controls there's an option which says Playback is tied to the player's location. If checked when you press Play, the camera paths are played back relative to the player's location. This is constantly updated, so if you move the player during playback, the camera paths move with it, which allows you to record action shots around the player with ease.
Once playback has started, changing this option has no effect.
Playback has a constant speed
When this is option is checked, which is the default, the camera will move with a constant speed over the path you've defined. If you uncheck this option, the camera will move with different speeds over the different segments of the path. It depends on what you want to do with the path what option is right for you. Further down in this article you can learn more about how the system calculates the speed of the camera when you opt for a non-constant speed.
Use an 'ease in' at the start of the path
When you check this option, you'll get a slow start speed that gently increases to the normal speed. If you want to have the start to be at the speed of the rest of the segment/path, keep this option unchecked.
Use an 'ease out' at the end of the path
Similar to the 'ease in' at the start, but now at the end of the path to gently slow down instead of a sudden stop.
If you have enabled the 'Playback has a constant speed' and also one or both of the 'ease in/out' settings, you might not get what you'd expect as ease in/out conflicts with a constant-speed playback. The options are available at the same time, and will result in a playback that's unique to your settings but it's recommended to choose either constant speed or non-constant speed and one or more ease in/out.
Three second delay at the start of a playback
It's often desirable to have a short delay before recording, especially when you're recording gameplay and not a static/paused scene. To have a three second delay before the actual playback starts, check the checkbox Wait 3 seconds before playback stats after clicking Play. This will show a 3 second count down timer so you can get ready and after the timer reaches zero it'll start playback.
The camera shake factors
There are four camera shake factors you can configure to introduce camera shake for camera movement along a camera path: Shake frequency for movement and rotation, Shake movement strength and Shake rotation strength. These factors can give a more natural, hand-held looking footage to a camera path movement which would otherwise look a bit 'robotic'.
The Shake movement frequency and Shake rotation frequency control how fast the movement and rotation shake factors change direction. The higher the value the faster they'll 'shake'. The Shake movement strength controls the amount of movement shake will be added to the camera location in the up/down/left/right/front/back directions. The Shake rotation strength controls the amount of rotation shake will be added to the camera orientation in pitch/yaw/roll.
The strength will be applied equally among all directions and rotations. Try to experiment with which values work best for the speed you move your camera; a faster moving camera could use a camera shake with higher strengths than a slow moving camera. Good starting values are 1.5-2 for the frequencies and 0.4-0.5 for the strengths. Setting the sliders to 0 will remove all shake factors from the camera.
These factors will override the ones you can set in the Configuration tab, even if they're set to 0.
The actions to perform while playing
This section allows you to specify what should happen when playback starts. It has the following options
- Unpause game (if paused)
- If the game is paused using the regular pause / unpause game key, and you want to unpause the game when playback is started, check this checkbox. If checked, after playback has stopped, the game is paused again.
- Override game speed
- (Optional setting, only available if the game supports gamespeed control). If you want to have the game run on a different speed (e.g. in slow motion) when the path is playing,
check this checkbox and set the desired game speed with the slider. The value
1.0is normal game speed,0.0is paused, and2.0is twice as fast. - Close window while playing
- This checkbox will make sure that the Camera Path Control Window is closed when playback starts. For recording the screen during playback this is recommended. Once playback has stopped the window will automatically be shown again
The path controls
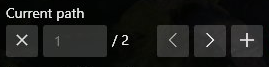
The path controls allow you to define paths. You can define multiple paths and switch between them during playback at will. A valid path has two or more nodes. To create a path you click the + button. The < and > buttons allow you to browse through the paths defined. Browsing to another path will automatically select its first node.
The numbers shown, e.g. the 1 / 2 as shown above, specify which path is selected and how many paths there are. In the example above, there are two paths defined and the first one is selected as the active path. The X button deletes the active path. Deleting a path is irreversible, all nodes defined on the path are destroyed.
The node controls

The node controls allow you to define nodes and edit nodes on the active path, which is the path currently selected in the path controls. The + button adds a new node to the path at the end of the path, using the current camera location, orientation and field of view (FoV). Depending on the game it will also record additional settings like fog and time of day.
Clicking the < and > buttons will step through the nodes on the path. The numbers shown, like 1 / 4 as shown above, specify which node is the selected and how many nodes
are defined on the path. Clicking the pencil button will replace the active node with a new node with the current camera location, orientation, field of view and the additional
setting values supported by the game.
Clicking the v button next to the pencil button will insert a new node in front of the active node with the current camera location, orientation, field of view and additional setting values supported by the game.
Clicking the ^ button will insert a new node after the active node with the current camera location, orientation, field of view and additional setting values supported by the game.
The X button deletes the active node from the path. This action is irreversible.
To copy a node from one path to another, you can first browse to the node on the path you want to copy from, which will move the camera to the node's location and set the photomode mod's settings to the ones recorded in the node, like Time of day and Fog settings for instance. Then select the path to copy to, and simply add a new node. The current state of the camera will then be recorded as a new node on the path.
Window specific controls
The Camera Path Control Window has one other control:
- Window opacity
- This slider will allow you to control the opacity (down to 10%) of the Camera Path Control Window so it doesn't block your view of the game window.
Defining your first path
This all might sound a little daunting at first but it's straight forward. To define your first path, first make sure you're in the game and that you have enabled the camera (by
default this is the Insert key). It's best to bring up the camera path control window so you see what's going on. Click the Show camera path control window toggle at the bottom
of the IGCS client window. This should bring up the path window as shown above.

The add new path button
To define your first path, we first need to add a new path, so click the + button in the path controls (see above). This should add a path and you should now see 1 / 1
below Current path as indication you now have one path and it's also the active path.
Now lets define the first node. Alt-tab back into the game window so it has the focus. Move the camera to the start of your path. When you have setup the camera at the
location and orientation and with the FoV you want, alt-tab to the Camera Path Control window and click the + button in the node controls (see above). You now should see 1 / 1
below Current node in path as indication there's one node in the path and it's the current node.
To make a valid path you have to have at least two nodes on the path, so alt-tab back to the game window and move the camera some distance away from the start spot and rotate it a bit.
Alt-tab back to the Camera Path Control window and again click the + button in the nodes controls. It should now show 2 / 2 below Current node in path as you defined two
nodes and the second node you just defined is also the active one.
You can now click the < and > buttons to move between the two nodes. To play the path, specify a duration in seconds (larger than 0) and click Play. The camera will now smoothly transition over the path between the two nodes you defined, slowly rotating and changing the fov (if you changed it). After the camera reached the end and you didn't select to loop the playback, the playback will automatically stop.
You can now add new nodes to the path by moving the camera to yet another location and orientation and follow the same procedure as with the second node.
That's it, you defined your first path!
Advanced usages
Multiple paths
One path is nice, but two or more paths is of course nicer. The created paths can all be selected dynamically during playback. So you can start with path 1 and then after a few
seconds switch to path 2 and after a few seconds again switch to path 3 etc. This could greatly help recording a single take of a scene using multiple camera cuts. To switch
between paths during playback, use the predefined hotkeys Numpad 1 for path 1, Numpad 2 for path 2 etc. to Numpad 9 for path 9 (if available).
Using paths as camera save points
Camera paths can also be used to store camera location/orientations settings temporary so you can move around the camera in a scene for another angle. Say you run into a nice scene but you don't know immediately from which angle to take a shot. So you first setup the shot at certain location but you also want to try a shot of the scene from another angle, however you might want to go back to your current setup. To preserve your current camera setup, add it as a node to a path.
Simply create a new path if you haven't already have a path defined, and without moving the camera, add a node. Your current camera location, orientation, field of view and e.g. the other settings recorded for a node for the particular game you're playing, are now saved in that node.
You can now move the camera to another location in the scene and try different angles. If you want to move the camera back to the location and orientation you had previously, simply select the camera path and navigate to the node you just added. The camera will then move to the location and orientation it had when you created the node.
Things to keep in mind
Let's consider a path with 3 nodes. It's described with the 3 dots and the black line in the image below. The red arrows are the direction the camera looks at in these nodes.

A camera path with 3 nodes
The path is a curve, not a straight line
As you can see the path curves through the middle node B, it doesn't make a straight corner there. This also means there's no straight line between the middle node B and the left node C. When playing this path the camera will therefore fly a bit further than the horizontal shortest path between B and C. This can be surprising at first if you e.g. want to make a path that makes the camera move straight from one point to another.
What to expect when you choose for a non-constant playback speed
When you opt for a non-constant playback speed for the camera the system does the following: first it divides the path in equal time slots. This means that when we play the path going from A through B to C over 20 seconds, the camera will arrive at B after 10 seconds and at C after 20 seconds. The segment A-B however is longer than the segment B-C. To make sure the camera arrives after 10 seconds at node B, the speed is faster between A-B than it is between B-C, as it has to cover more ground between A-B than between B-C.
This means that the transition between speeds at node B might be noticable in your playback. If the camera makes a rotation at that point, like in the example above, it's not that noticable so take advantage of that. Additionally, if you want slow movement in a segment, just make it very short relative to the other segments.