Getting started
All photomode mods are based on a common system, which is always used in the same way. The guide below therefore is for all camera tools/photo mode mods, including the Universal Unreal Engine Unlockers.
This guide and other documentation on this site use 'photomode mod' and 'camera tool' and these mean the same thing. To be consistant this page will only use 'photomode mod'.
How to use the photomode mods
Before we begin
It's recommended to use a dedicated folder for the photomode mods, e.g. in your Documents folder. To do that, open Windows File Explorer and navigate to Documents. In Documents, create the folder called My Cameras. In this guide you'll download and store the cameras in that folder. Of course if you want to store the photomode mods elsewhere, you can, it's not required to use these folders.
Downloading the photomode mod zip file
The first step is to download the zip file with the photomode mod you want to use. These are found on the patreon site of Otis_Inf, at the bottom of the photomode mod's page. To quickly find the right page, you can e.g. go to the photomode mod's documentation page and click on the 'Post on patreon' link at the top of the page. This will immediately bring you to the right page on patreon.
Be sure to download all zips of all tools you likely think you'll need when your subscription is active, including both Unreal Engine Unlockers.
By default your browser likely will download the zip files to your Downloads folder. After doing so, please move the zip file to the Documents\My Cameras folder that you've created in the 'Before we begin' section.
Unpacking the zip file
After you've download the photomode mod zip file, e.g. ACValhalla_CameraTools_v110.zip, and moved to the Documents\My Cameras folder, you need to unpack it. To do that, right-click the zip file in Windows File Explorer and select 'Extract All...'. This will guide you through the process of unpacking the tools into a folder inside your My Cameras folder.
It might be you need to 'Unblock' the executable and / or dll's in the zip file. To do that in one go, before you click 'Extract All...', right-click the zip file, select 'Properties' and in the dialog that pops up the 'General' tab. If it shows an 'Unblock' checkbox in the bottom right corner, check it.
Every photomode mod comes with its own IGCSClient.exe. You can't use one IGCSClient.exe from one photomode mod with the files of another photomode mod. To be able to quickly access the IGCSClient.exe, it's recommended to create a shortcut to it on your desktop. To do this, right-click the IGCSClient.exe file and drag it on your desktop, where you let go of your right-mouse button. A small menu pops up, select 'Create shortcuts here'. Alternatively you can right-click on your desktop, select New -> Shortcut and browse to the IGCSClient.exe.
You don't need to unpack the zip into the game folder, it's recommended not to do this.
You're now set!
Your first session
To get started with the photomode mod, you typically first start the game. As this is your first session, if you're planning to use hotsampling, you'll have to make sure the game has been configured to hotsample properly. Hotsampling is basically resizing the game's resolution dynamically prior to taking the shot, so you'll get higher resolution shots. The photomode mods in most cases offer hotsampling support and to make the game resize to the proper resolution, it has to run in either windowed mode or borderless windowed mode. This depends on the game, so to make sure what you need, please check the top sectoin of the photomode mod's documentation page.
As an example, we'll use Assassin's Creed Valhalla here. The top section of the documentation page for its photomode mod says "Hotsampling via Running the game in windowed mode". This means the in-game setting for display has to be set to Windowed, so the game runs in a window with a title bar. Don't Panic! You don't have to run the game in a tiny window on your desktop! You'll quickly learn how to properly run your game fullscreen and be able to hotsample properly.
Once the game has been properly setup to run as windowed, and you're in the main menu, you can start the IGCSClient.exe and click on the Inject DLL button as shown in the screenshot below, highlighted with a red line:
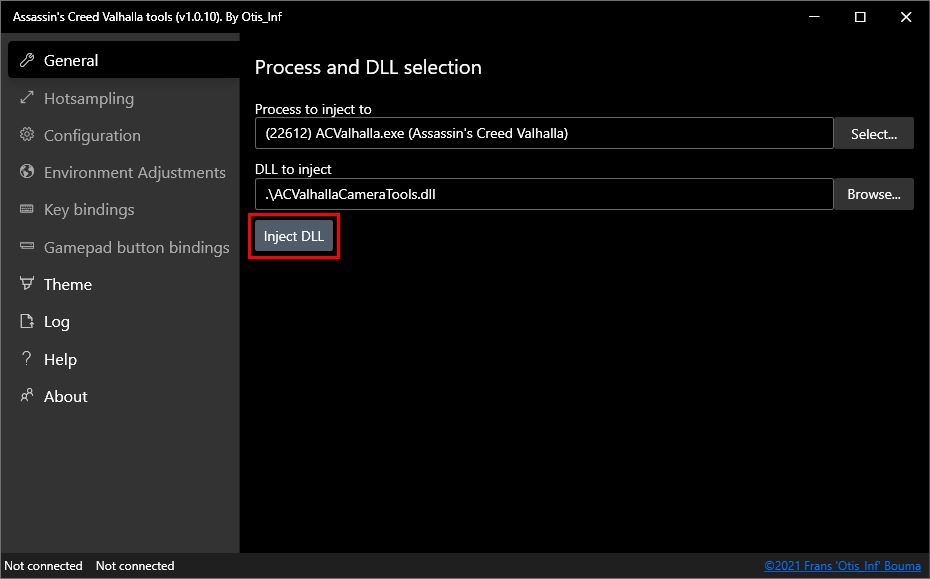
The general tab before injection
If the IGCSClient states to select the process, the .exe it is looking for isn't visible to it or you're running a different version.
To select the right exe, please click the Select button to select it manually. This might happen if you e.g. use the UPlay+ version of a game or
run the game as Administrator and don't run the IGCSClient as Administrator. It's not needed to do so, but in case you want to run the game as Administrator,
you have to run the IGCSClient.exe also as Administrator.
After you've clicked Inject DLL, the client will inject the photomode mod dll into the game's process and will integrate with it. It should look like the following screenshot, and all tabs in the client should now be available:
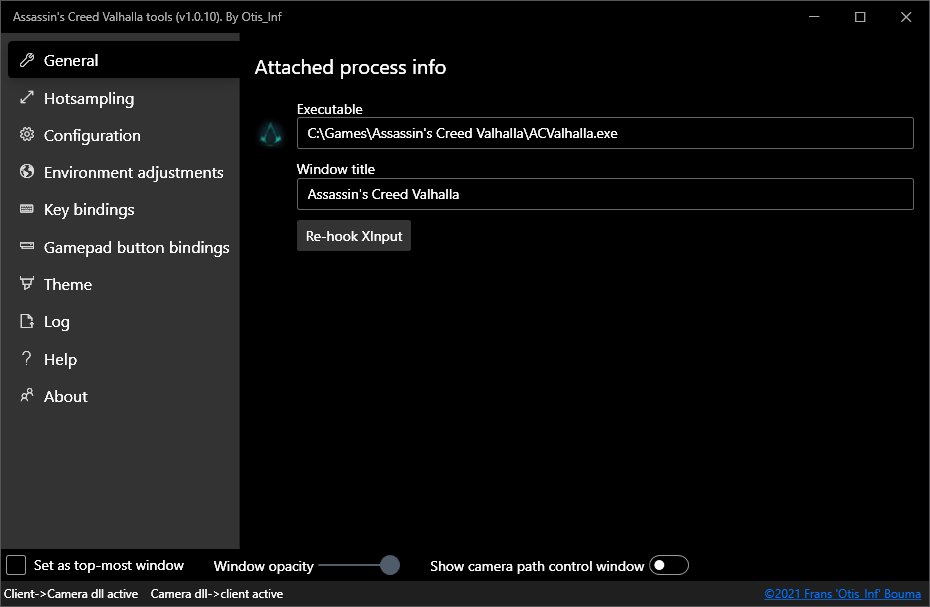
The General tab after injection
Once the photomode mod has found the camera in the game it'll fully initialize the features. You'll get a notification in the left top corner of your monitor when that happens. After the camera has been found, you can use the features, like pause the game, hide the hud and enable the camera.
It's important to keep the IGCSClient.exe window open! Don't close it for the duration of the game session.
Get a full screen window
As you needed to run the game in a window with a title bar to get proper hotsampling, you of course want to get rid of that title bar. To get a full screen window to properly enjoy the game, go to the Hotsampling tab in the IGCSClient. This looks like the screenshot below
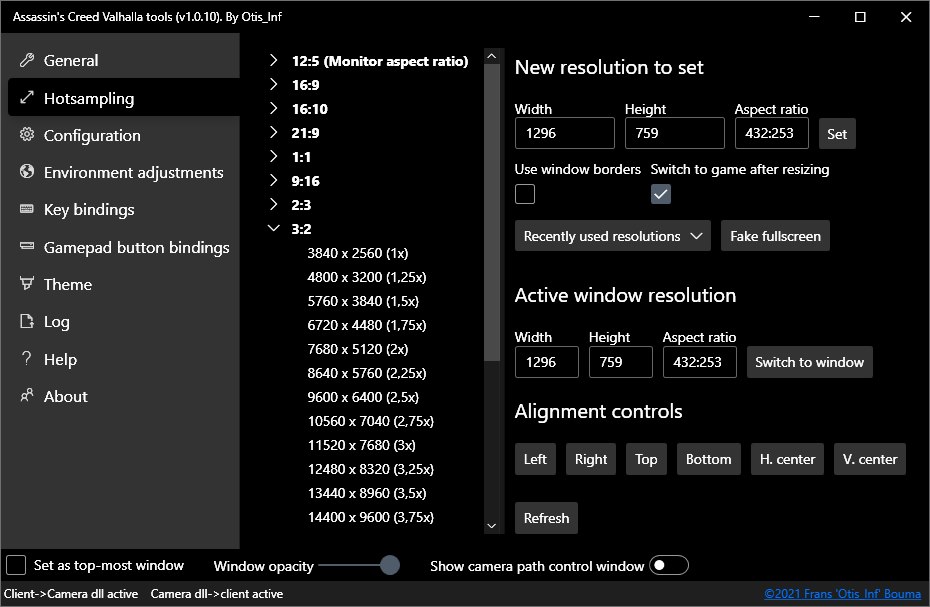
The Hotsampling tab
It might look a bit overwhelming at first, but the important button you have to use is the Fake fullscreen button in the middle-right, here marked with a red line. Click that and the game window will resize to a fullscreen window. Use this button every time after you've hotsampled to a higher resolution and want to go back to play the game.
Enable the camera and setup your first shot
Now that you have started the photomode mod and have it running in the game, you can take your shots. Load your save, and once you're in the game world, press Numpad 0 to pause the game and Del to toggle the HUD. Press Insert to toggle on the free camera. You can now move the camera around, rotate it and go whereever you want. Please see the Controls section for further details how to activate the various features and how to control the camera properly.
Done setting up your shot? You can now decide to e.g. take the shot in a higher resolution. To do that, go to the Hotsampling tab you visited earlier to get a fullscreen window. In the tree on the left you first select the aspect ratio and then the resolution you want to use. For this first time, it's recommended not to go into the extremes, so e.g. picking a 1.5x resolution might be a good choice. Click the resolution and then on the top right, click Set. The game window will now resize to the new resolution. Wait a bit to have it load all assets. Your game will run in a lower frame-rate because of the higher resolution.
You can now take your shot. As you didn't install Reshade in this guide, if you don't have it running in-game, taking a shot either requires you to press e.g. F12 to take a shot with Steam, or Alt-F1 if you have an NVidia GPU, or the shortcut for the XBox game bar if you have that running. I'd recommend to use Reshade however, as it comes with additional effects you can apply to your shot. See this guide for further details how to setup Reshade.
After you've taken the shot, please go back to the Hotsampling tab and click the 'Fake fullscreen' button you've used earlier. Your game window should now be again a fullscreen window. Press Insert to switch off the camera again, Del to enable the HUD again and Numpad 0 to unpause the game again. If you want to hotsample again to the resolution you used, it can be found below the Recently used resolutions by clicking that button.
Much more
There's of course much more on offer than just moving around the camera. Please see the General features and configuration section for further details on the general aspects of the photomode mod's features as well as the dedicated page on this site of the photomode mod you're currently using, by navigating to Photomode mods -> Game specific functionality.
The one thing to remember is that you don't need to learn everything right away. Take your time, experiment. You can't ruin your game, you can't ruin your save, so don't be afraid to try things out. It's also not needed to learn everything. If you're happy with using just 20% of the features, that's totally ok. What's key is that you have fun and enjoy the wonderful world of virtual photography.
Still have questions? Feel free to ask your question in the Discord or on Patreon, and also check the FAQ section, it might be your question can be found there.